
PalletVision is an AI-powered production tracking system purpose-built for the pallet industry. Using your existing IP or CCTV cameras — or new cameras supplied by PalletVision — it delivers real-time counts for pallet builds, repairs, dismantles, nailing machine output, board counts, and trim saw activity, with no manual tallying required.
This guide is designed for operations and IT teams preparing to deploy PalletVision. It covers everything from physical camera placement to web-application onboarding, edge server configuration, PalletConnect ERP integration, and troubleshooting.
Deployment at a Glance
| Deployment Time | 3-4 weeks from hardware arrival to live production data |
| ERP Integration | Native integration with PalletConnect ERP; flat-file export for other systems |
| Camera Support | Standard RTSP/IP cameras (CCTV, NVR-based, or standalone IP cameras). Min Resolution: 2MP (1080p). Min FPS: 10fps |
| Edge Server | Mac Studio system (preconfigured & provided by PalletVision) |
| Network Requirements | Ensure 2 Mbps per camera |
1. How PalletVision Works
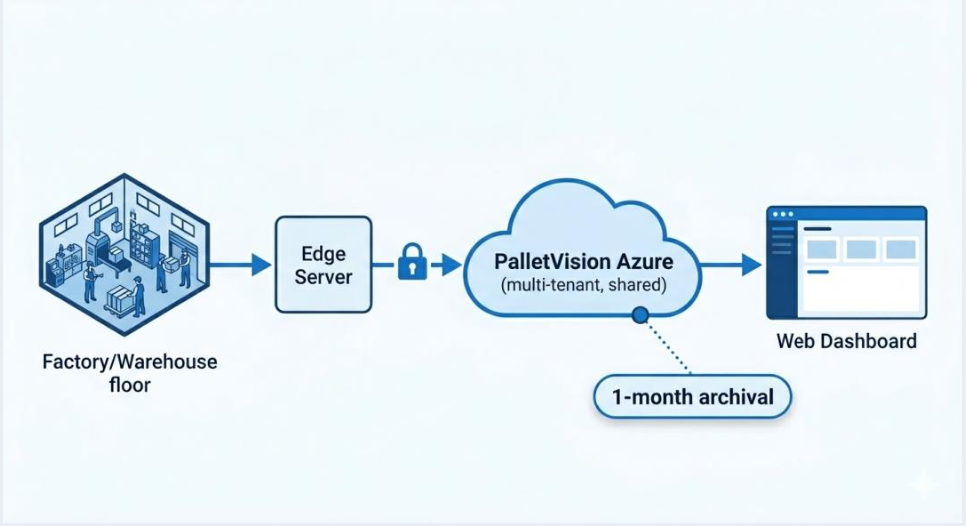
PalletVision runs AI models on an edge server installed at your facility. Camera video streams are processed locally — no direct footage is sent to the cloud. Detected events (pallet counts, board counts) are logged in real time and pushed to the PalletVision cloud dashboard and, optionally, to your PalletConnect ERP instance.
1.1 Core Counting Logic
PalletVision counts when a pallet (or board) enters a configured active zone. The AI model tracks object movement across the video frame and increments the counter each time the defined trigger condition is met — typically a pallet crossing a counting line or entering/exiting a zone polygon.
Important: Counts will only register if active zones are correctly configured. If you are not seeing expected counts, verifying zone setup is always the first troubleshooting step. You should also mark the zone boundaries as ACTIVE (green) — which would be used for counting, and passive (dotted-red) that would not count the pallets.
1.2 Supported Scenarios
Each camera can be assigned one or more of the following AI scenarios:
| Scenario | What It Tracks | Recommended Camera View |
|---|---|---|
| Pallet Build | Counts pallets assembled at build stations | Top-down or isometric; clear view of the work surface |
| Pallet Repair | Counts pallets repaired at repair stations | Top-down preferred; see full pallet on the work table |
| Pallet Dismantle | Counts pallets broken down / dismantled | Top-down or isometric; worker and pallets fully in frame |
| Nailing Machine | Counts pallets produced by automated nailing machines | Side or isometric facing the output conveyor |
| Board Count | Counts individual boards (97%+ accuracy on v2) | Top-down; boards spread on a flat surface, well lit |
| Trim Saw Count | Counts boards cut at trim saws | Isometric facing the cut side of the trim saw |
2. Camera Setup & Best Practices
2.1 Camera Placement
Camera placement is the single most important factor in counting accuracy. PalletVision supports two mounting orientations listed below. It is critical to have clear visibility into where the pallets are being kept in both of these cases. Any occlusions in the field of view may reduce the accuracy of detections.
Top-Down View (Preferred)
Mount the camera directly above the work area, looking straight down. This orientation provides the clearest view of pallets and boards with minimal occlusion from workers or equipment. Make sure each of the zones marked are within the camera field of view.
- Recommended mounting height: 10-15 feet above the work surface
- Ensure the entire work area (pallet + employee operating space) is within the frame
- Allow sufficient buffer on all four edges of the frame — never crop the work surface tightly
- Avoid mounting directly above overhead lights to prevent lens flare
Isometric View (Acceptable Alternative)
An angled view from a corner or wall works when overhead mounting is not possible. The camera should be positioned so the pallet and activity area are clearly visible without significant occlusion.
- Mount at 30-60 degrees from horizontal for best depth perspective
- Ensure pallets are never fully obscured by the worker's body during counting
- Avoid extreme side angles — the AI needs to see pallet top or side surface clearly
2.2 Distance & Field of View Guidelines
| Spec | Guideline |
|---|---|
| Recommended Height (top-down) | 10-15 feet above work surface |
| Minimum Field of View | Full pallet + 1 ft clearance on all sides |
| Maximum Field of View | No hard limit; avoid mounting so high that pallets appear smaller than 10% of frame width |
| Lens Recommendation | 2.8 mm - 4 mm wide-angle for tight spaces; 6 mm for higher mounting |
| IR / Low-Light | Recommended for facilities with variable or low lighting (night shifts, dim warehouse areas) |
2.3 Camera Hardware Requirements
PalletVision works with any camera that outputs a standard RTSP stream. Below are the minimum requirements for reliable AI processing:
| Spec | Requirement |
|---|---|
| Resolution | Minimum 1080p (1920x1080). 4K accepted but not required |
| Frame Rate | Minimum 10 FPS; 15-25 FPS recommended for high-speed lines |
| Bitrate | Allocate at least 2 Mbps per camera on your network for RTSP streaming |
| Stream Protocol | RTSP (H.264 codec preferred; H.265 accepted) |
| Night Vision / IR | Recommended for low-light environments |
| IP Rating | IP66 or higher recommended for dusty or outdoor-adjacent areas |
Best Practice: Camera kits from PalletVision are pre-configured and tested for optimal AI performance. If you are using existing cameras, verify they are outputting H.264 RTSP streams before onboarding.
2.4 Getting Your Camera's RTSP URL
Every IP camera and NVR exposes an RTSP stream URL. The format varies by manufacturer but follows a general pattern:
# Generic RTSP format:
rtsp://<username>:<password>@<camera-ip>:<port>/<stream-path>

# Common examples:
rtsp://admin:password@192.168.1.64:554/stream1                              # Hikvision/Dahua
rtsp://admin:password@192.168.1.64:554/cam/realmonitor?channel=1&subtype=0  # Dahua NVR
rtsp://admin:password@192.168.1.64:554/Streaming/Channels/101               # Hikvision
To find your camera's RTSP URL:
- Log in to the camera or NVR's web interface using its IP address.
- Navigate to Network > Advanced > RTSP or Video > Stream settings.
- Note the RTSP port (default: 554) and the stream path for the main stream (channel 1 or stream 1).
- Construct the URL using the format above. Test before entering into PalletVision.
Note: If you purchased a PalletVision camera kit, RTSP URLs are pre-configured and provided in the kit documentation. For NVR systems, each physical camera port has its own RTSP channel number (e.g., channel=1, channel=2, ...).
2.5 Testing Camera Streams with VLC
Before onboarding cameras into PalletVision, validate that each RTSP stream is reachable and performing correctly using VLC Media Player (free, open-source).
Step 1 — Install VLC
Download from: https://www.videolan.org/vlc/. Available on Windows, macOS, and Linux.
Step 2 — Open a Network Stream
In VLC, go to: Media > Open Network Stream (Ctrl+N on Windows). Enter the full RTSP URL of your camera (e.g., rtsp://admin:password@192.168.1.64:554/stream1). Click Play.
Step 3 — Verify Each Camera
Confirm the video plays without buffering or artifacts. Check the frame rate by opening: Tools > Media Information > Statistics. Aim for a steady frame rate at or above 10 FPS. Repeat for every camera you plan to onboard.
Step 4 — Test Multiple Streams Simultaneously
Open multiple VLC instances (one per camera) to simulate the load PalletVision will place on your network. Watch for frame drops, buffering, or connection drops — these indicate insufficient network bandwidth. If issues arise, check your switch capacity and ensure each camera has a dedicated 2 Mbps allocation.
Important: Do not proceed with camera onboarding if streams are unstable or below 10 FPS in VLC. Common causes: insufficient network bandwidth, camera firmware issues, incorrect RTSP URL, or NAT/firewall blocking port 554.
3. Web Application — Guided Onboarding Flow
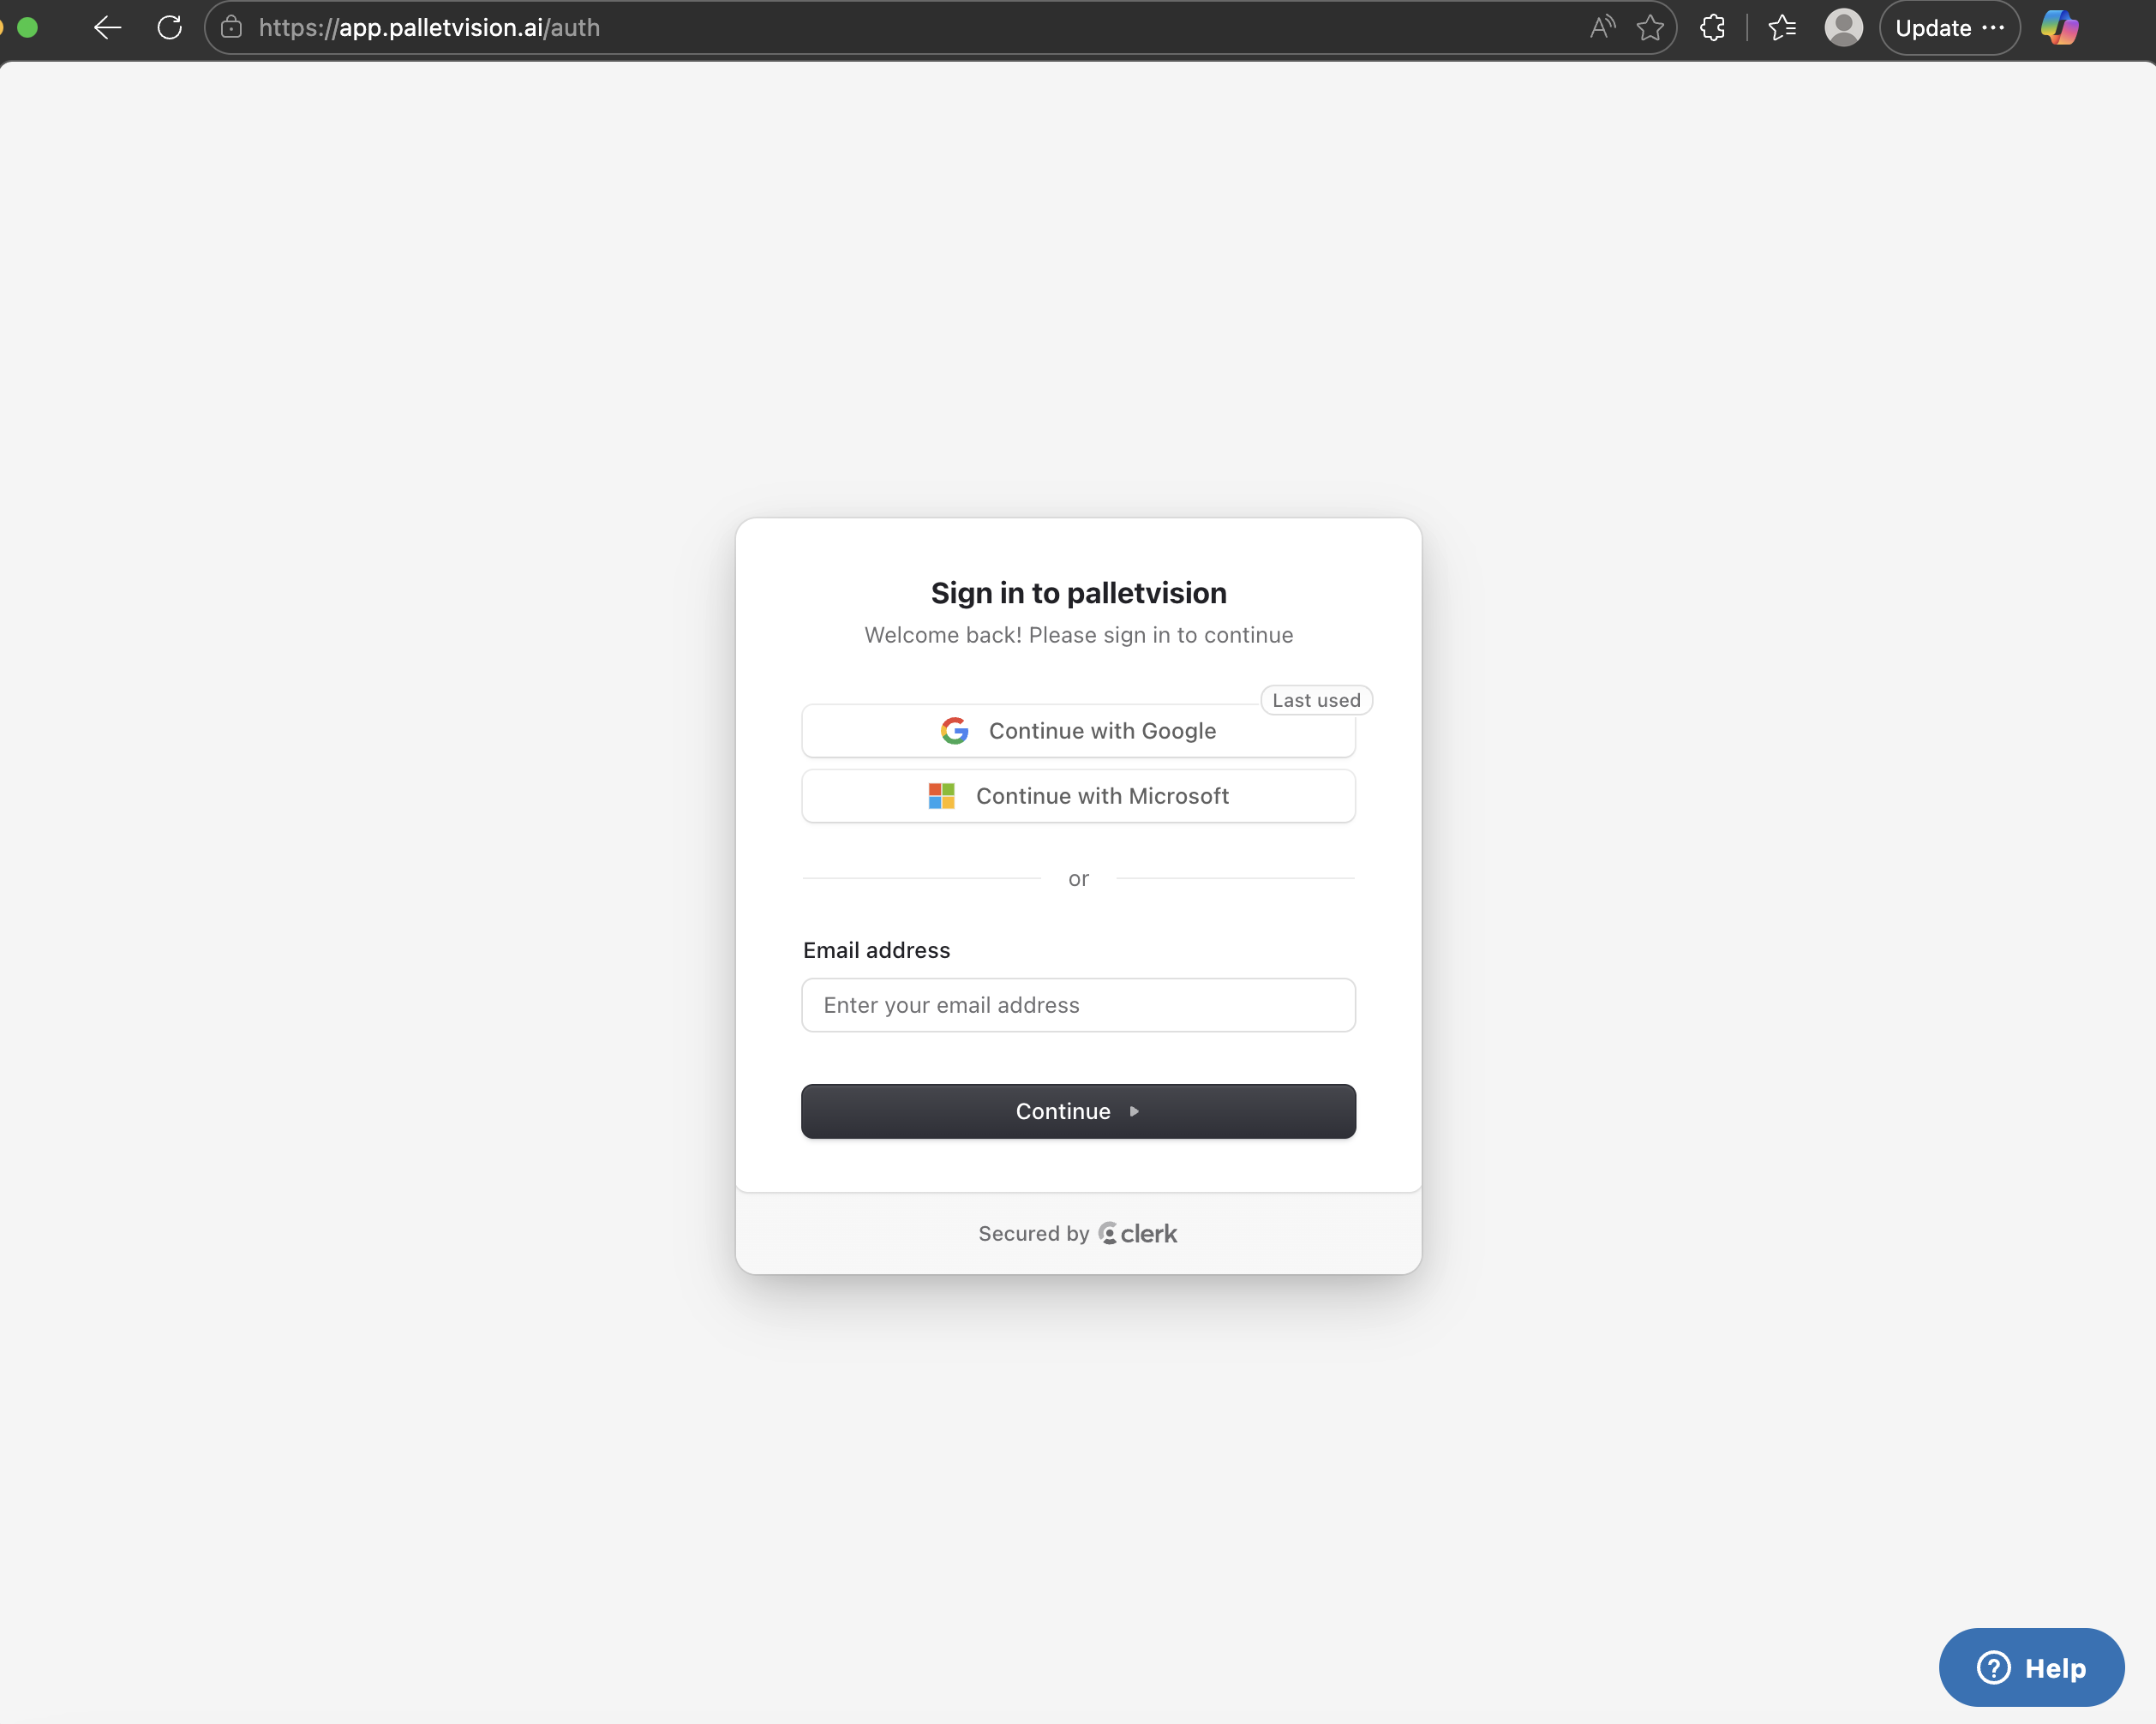
The PalletVision web application walks you through a guided setup flow. Access it at your assigned subdomain or via https://app.palletvision.ai. The onboarding has four phases: account setup, camera onboarding, zone & scenario configuration, and dashboard review.
3.1 Step 1 — Create Your Account
Step 1.1 — Sign Up
Once you sign-up, you will receive an invite from PalletVision system to get started. This email will come to your registered email account. You can click on this link to setup your password.
You can also use your social sign in through Google or Microsoft Authenticator. PalletVision recommends you use a 2 Factor Authentication for accessing the platform.
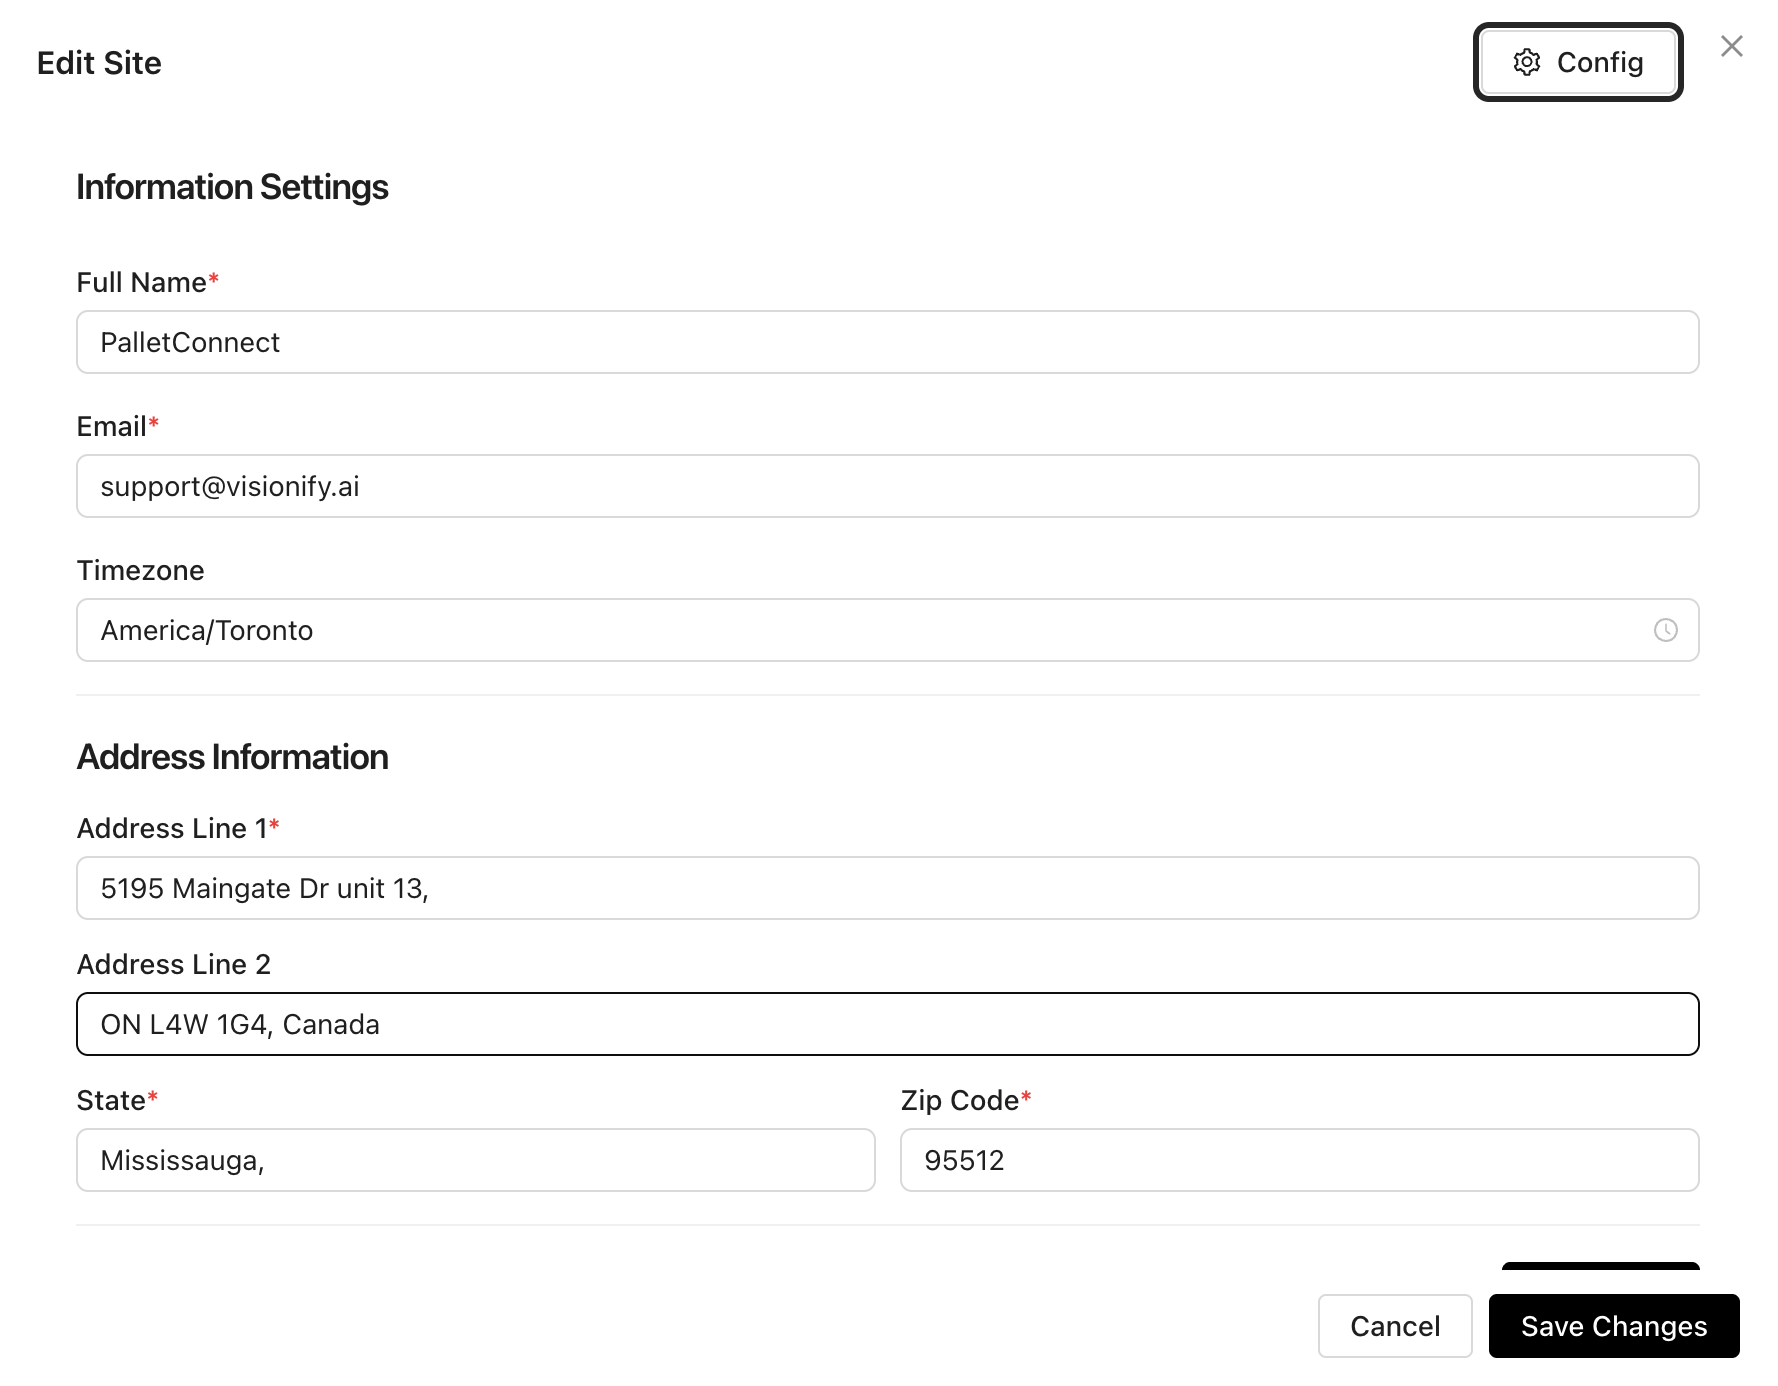
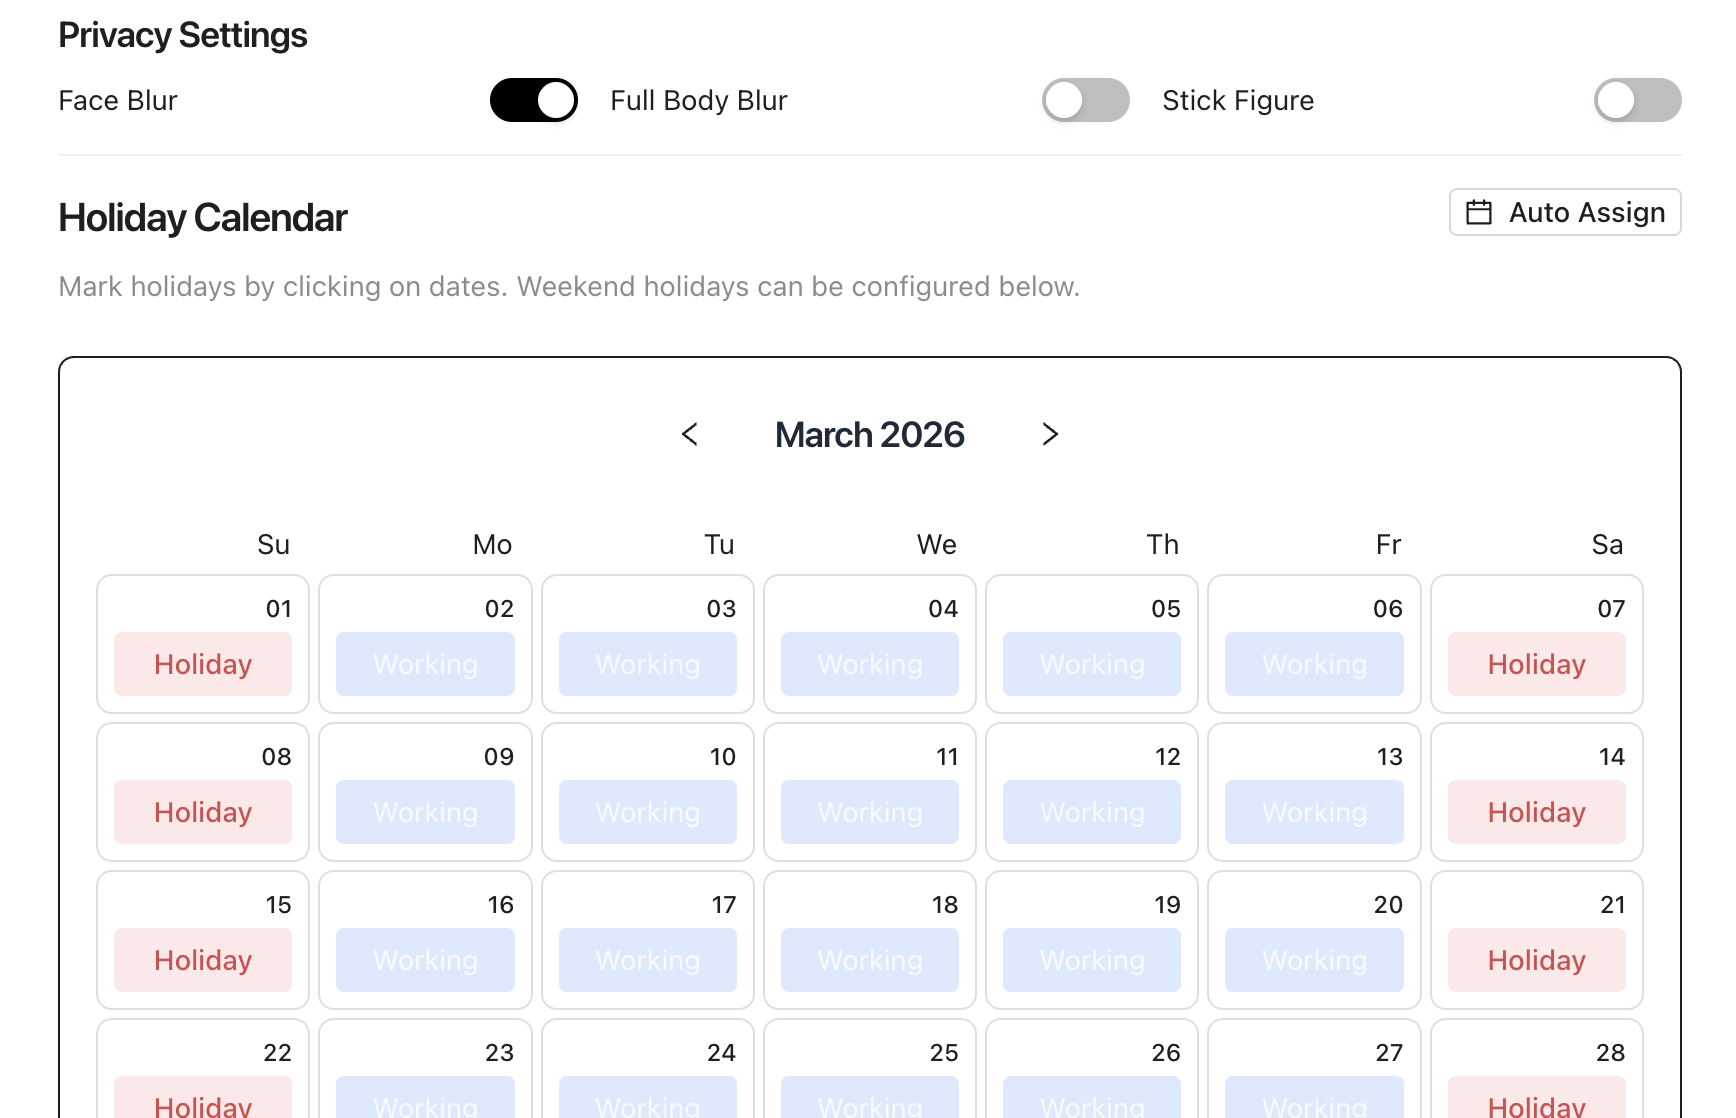
Step 1.2 — Set Up Your Facility Profile
- Enter facility name, address, and time zone.
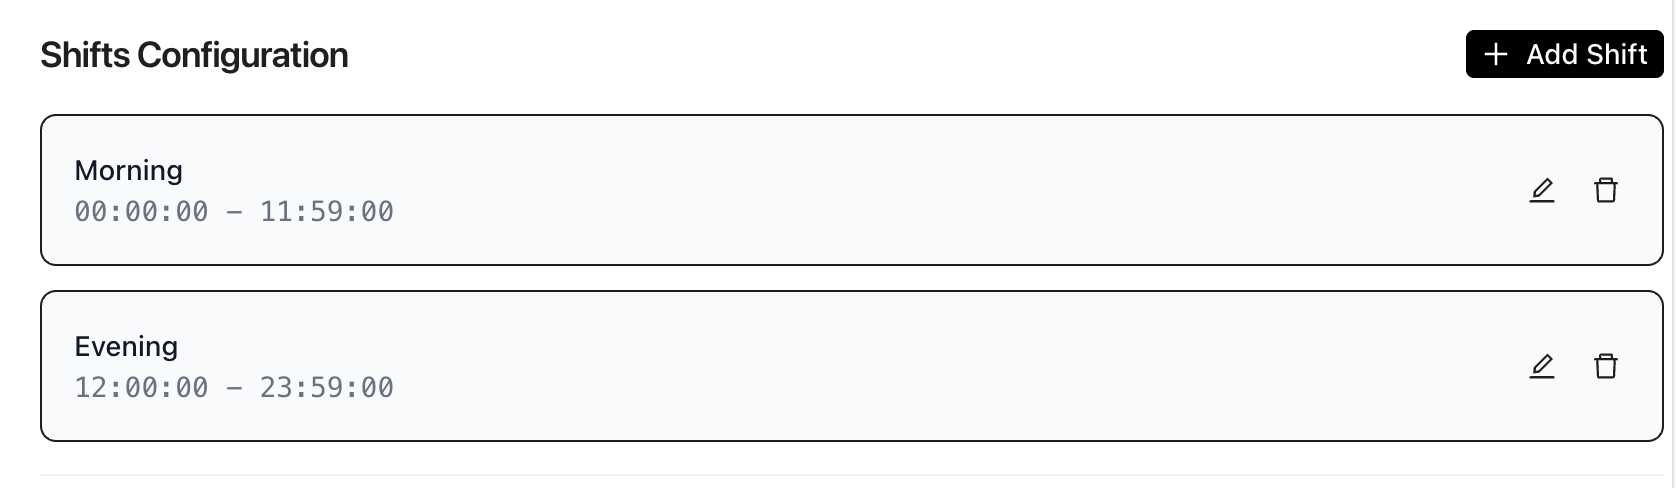
- Configure your shift schedule (shift start/end times, number of shifts).
- Configure the holiday calendar (default settings work fine for US and Canada).
- Configure Privacy Settings (face blur, full body blur).
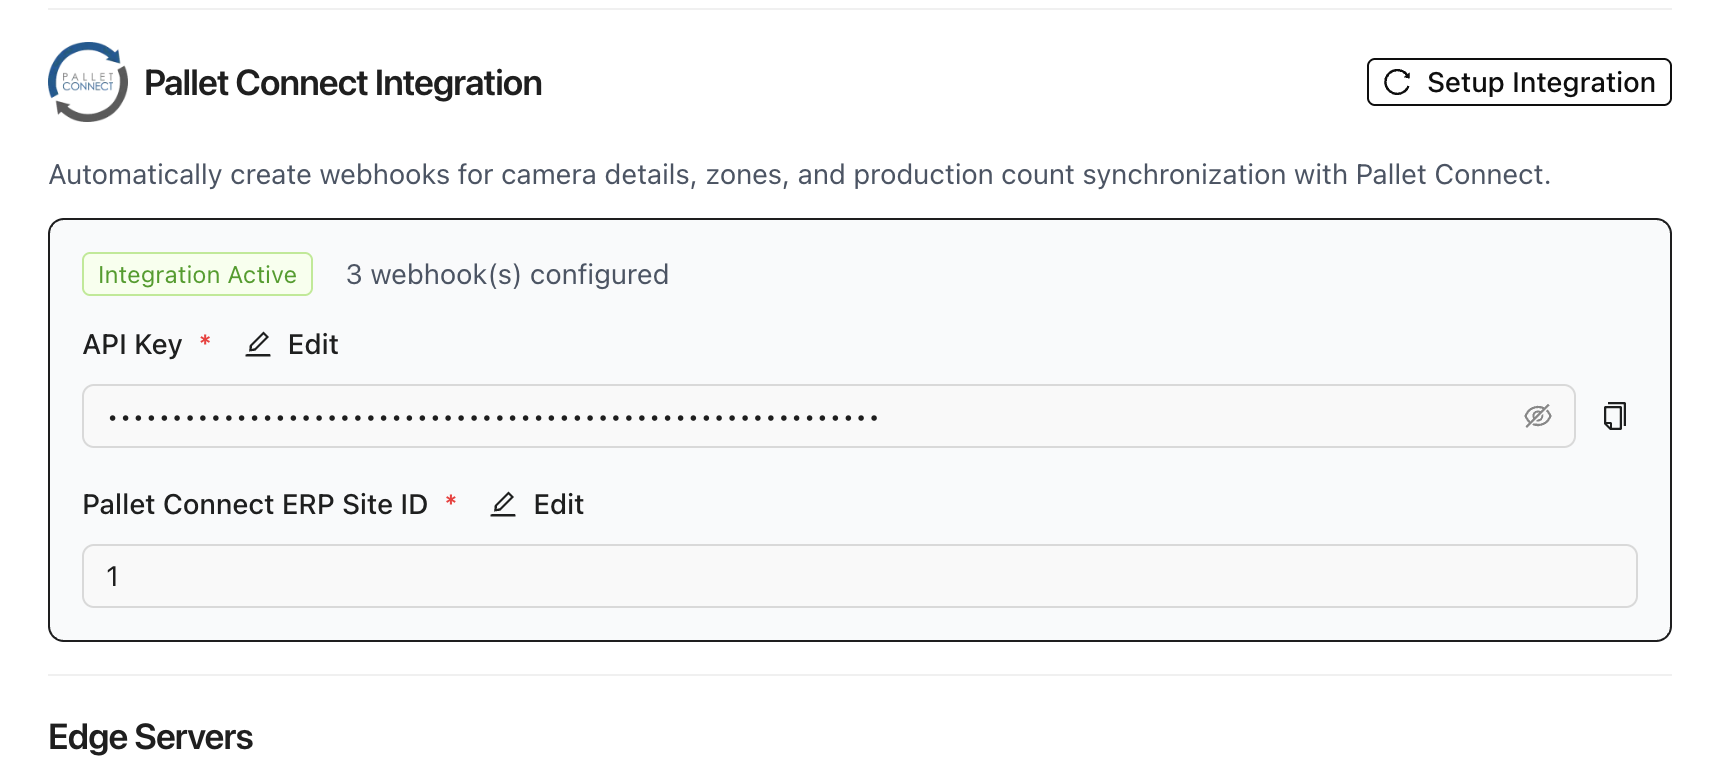
- Configure PalletConnect API Integration. Enter the API key (PalletVision team will provide this).
3.2 Step 2 — Camera Onboarding
Adding cameras is the most critical step. Ensure you have your RTSP URLs ready (see Section 2.4).
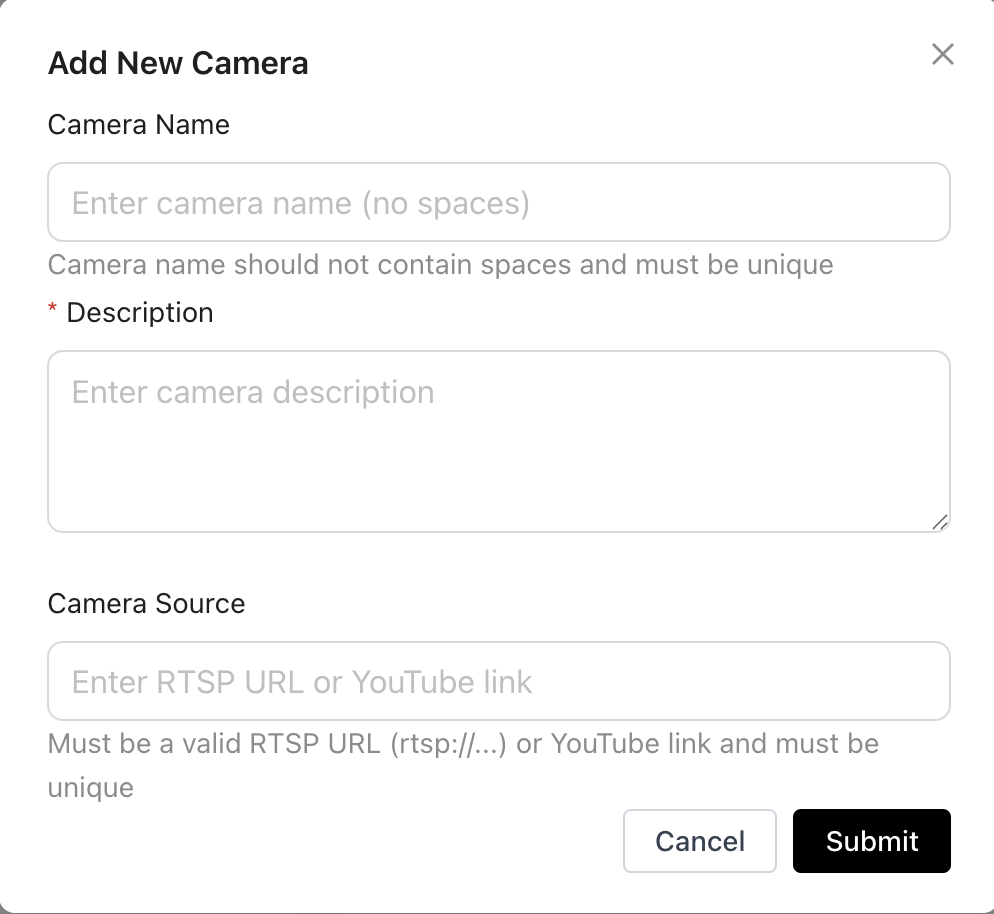
Step 2.1 — Add a Camera
- Navigate to Cameras > Add Camera.
- Enter a descriptive camera name (e.g., "Repair Station 1 — Line A").
- Paste the RTSP URL.
- Click Test Connection — PalletVision will verify the stream is reachable.
- Restart the Edge Server.
Step 2.2 — Confirm Live Preview
- A live preview thumbnail should appear within 5-10 seconds.
- Confirm the view is clear, correctly oriented, and covers the intended work area.
- If the preview is black or frozen, re-verify the RTSP URL and network connectivity.
- Validate the camera angle is accurate and field-of-view is fully capturing the zones where pallets will be located.
Step 2.3 — Repeat for All Cameras
Add each camera individually. Name cameras by station and line for easy identification in dashboards.
3.3 Step 3 — Zone Configuration
Zones define the exact area the AI will monitor for each camera. This step is critical — incorrect or missing zones are the most common cause of missed counts.
Step 3.1 — Open Zone Editor
From the camera details page, click on the configure / settings icon. The zone editor opens with a live still frame of the camera feed.
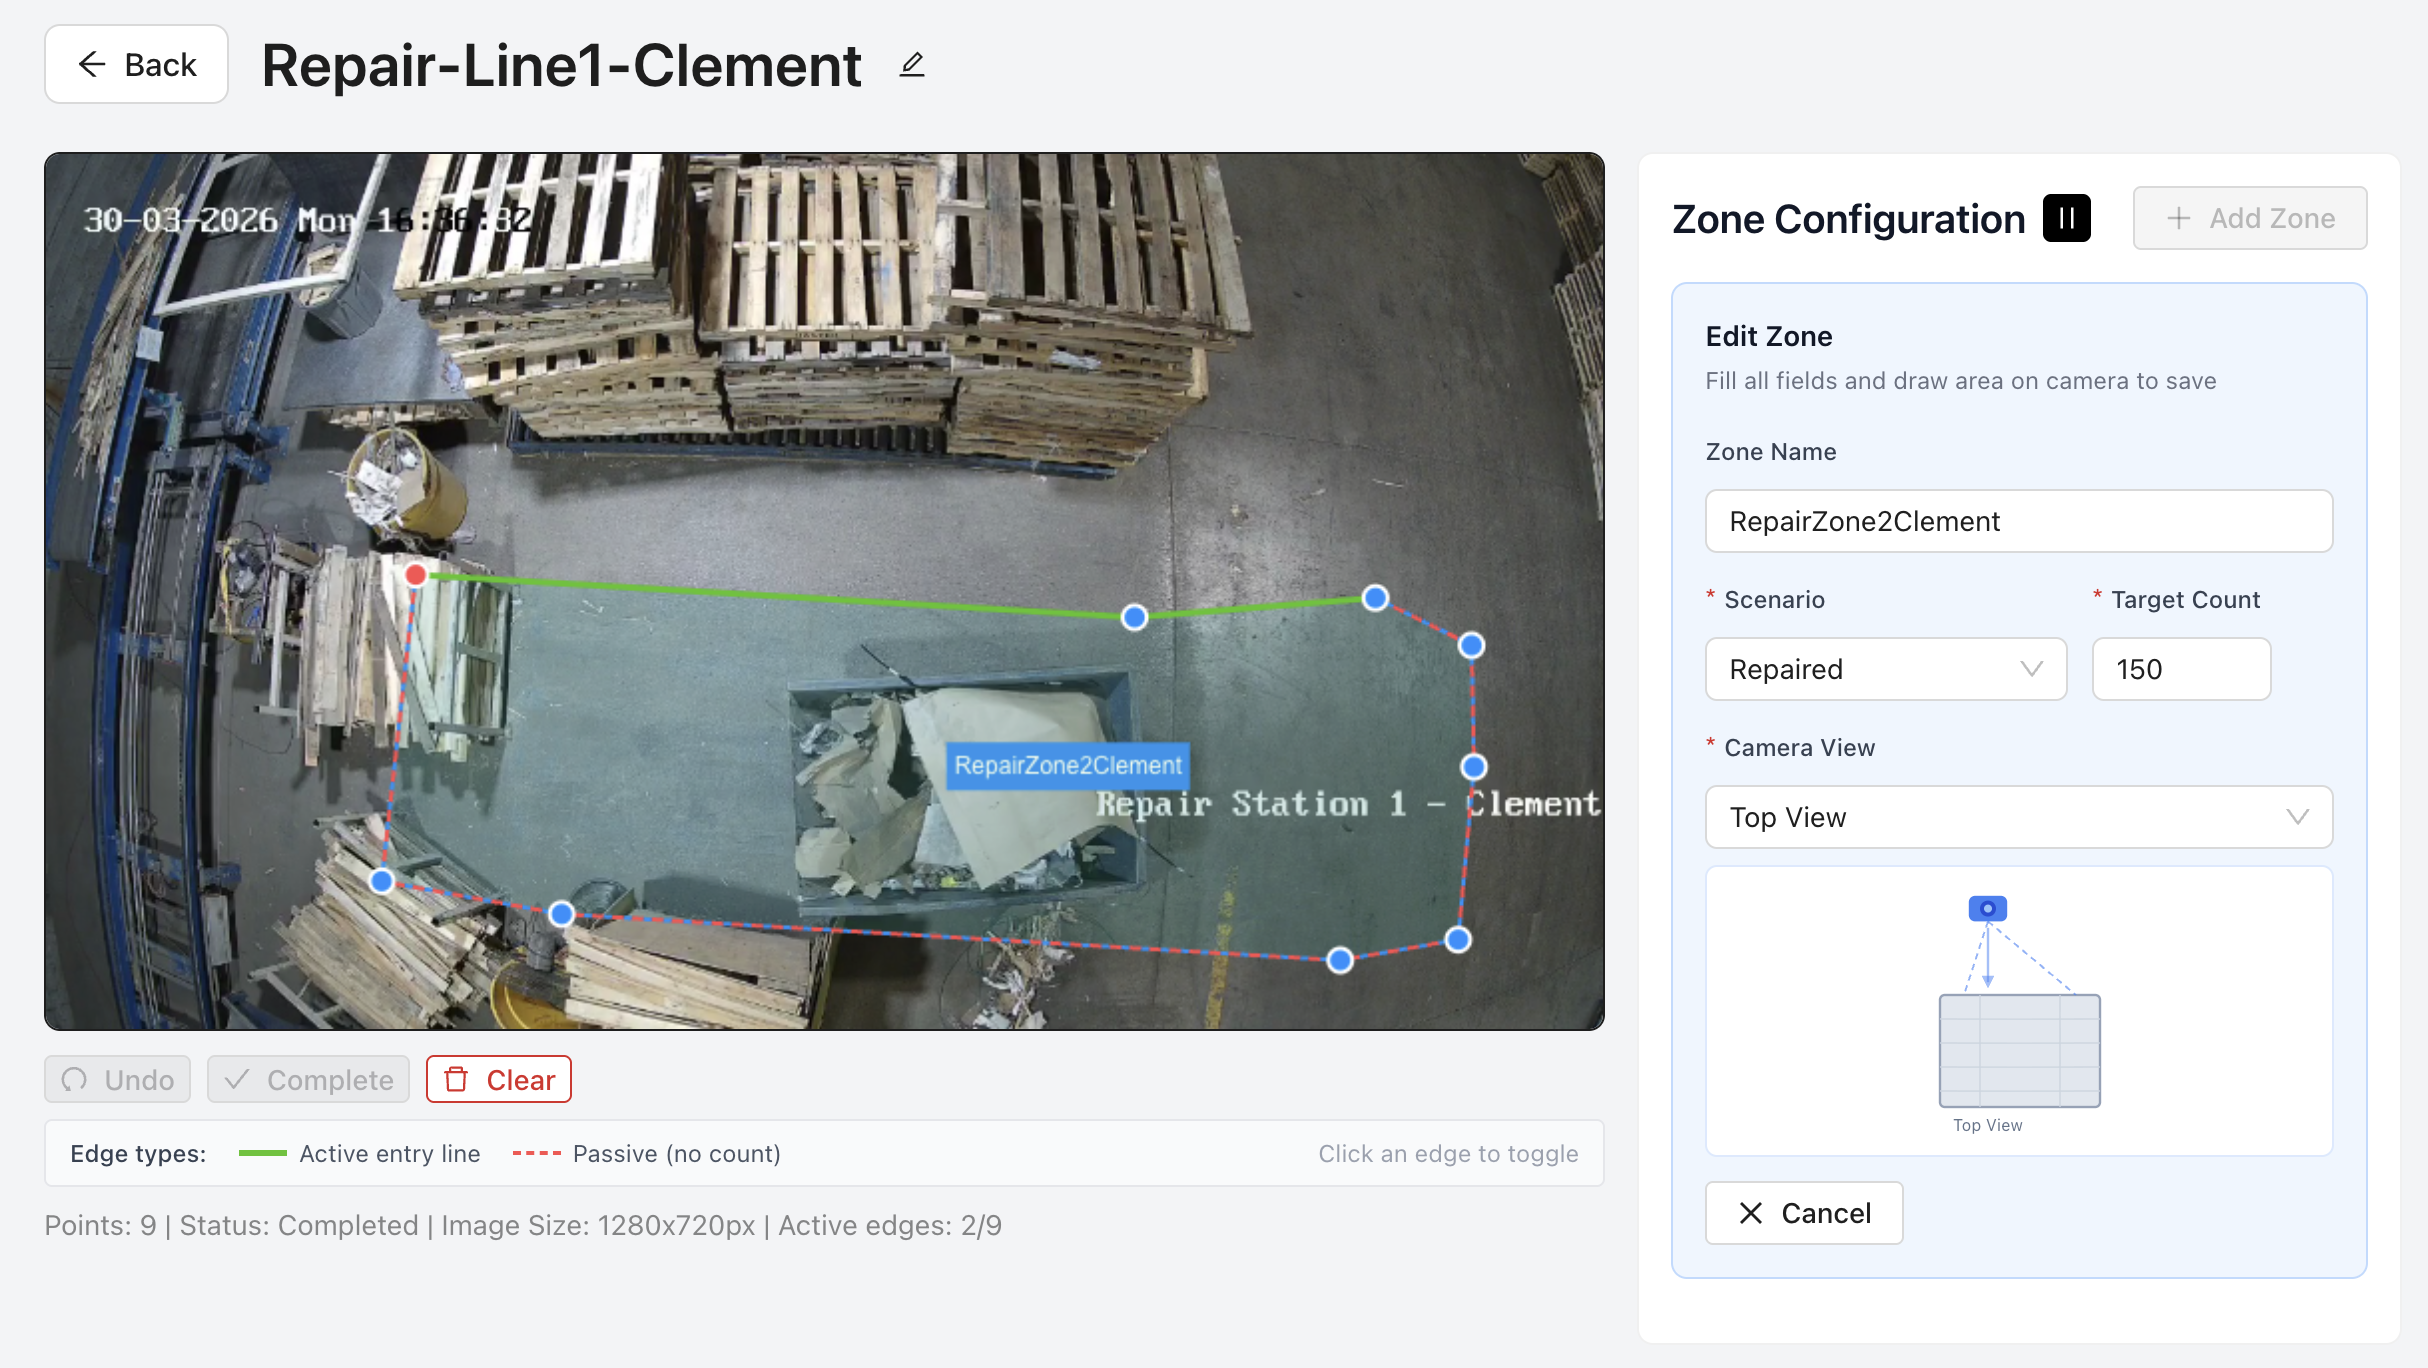
Step 3.2 — Draw Your Active Zone
- Click Add Zone and draw a polygon around the area where pallets should be counted.
- Ensure the entire work surface is included — from where a pallet arrives to where it exits.
- Avoid extending zones into aisles or areas where pallets are merely stored (this can cause false counts).
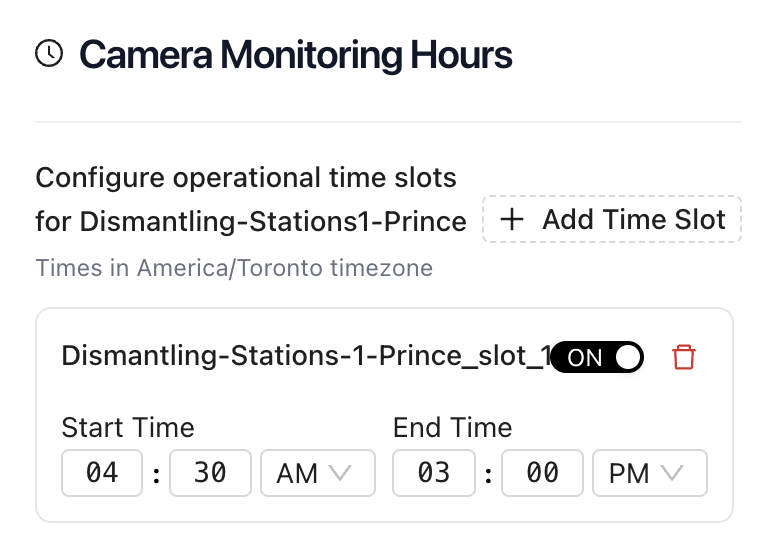
- For each zone configure the monitoring hours (operating hour time slots).
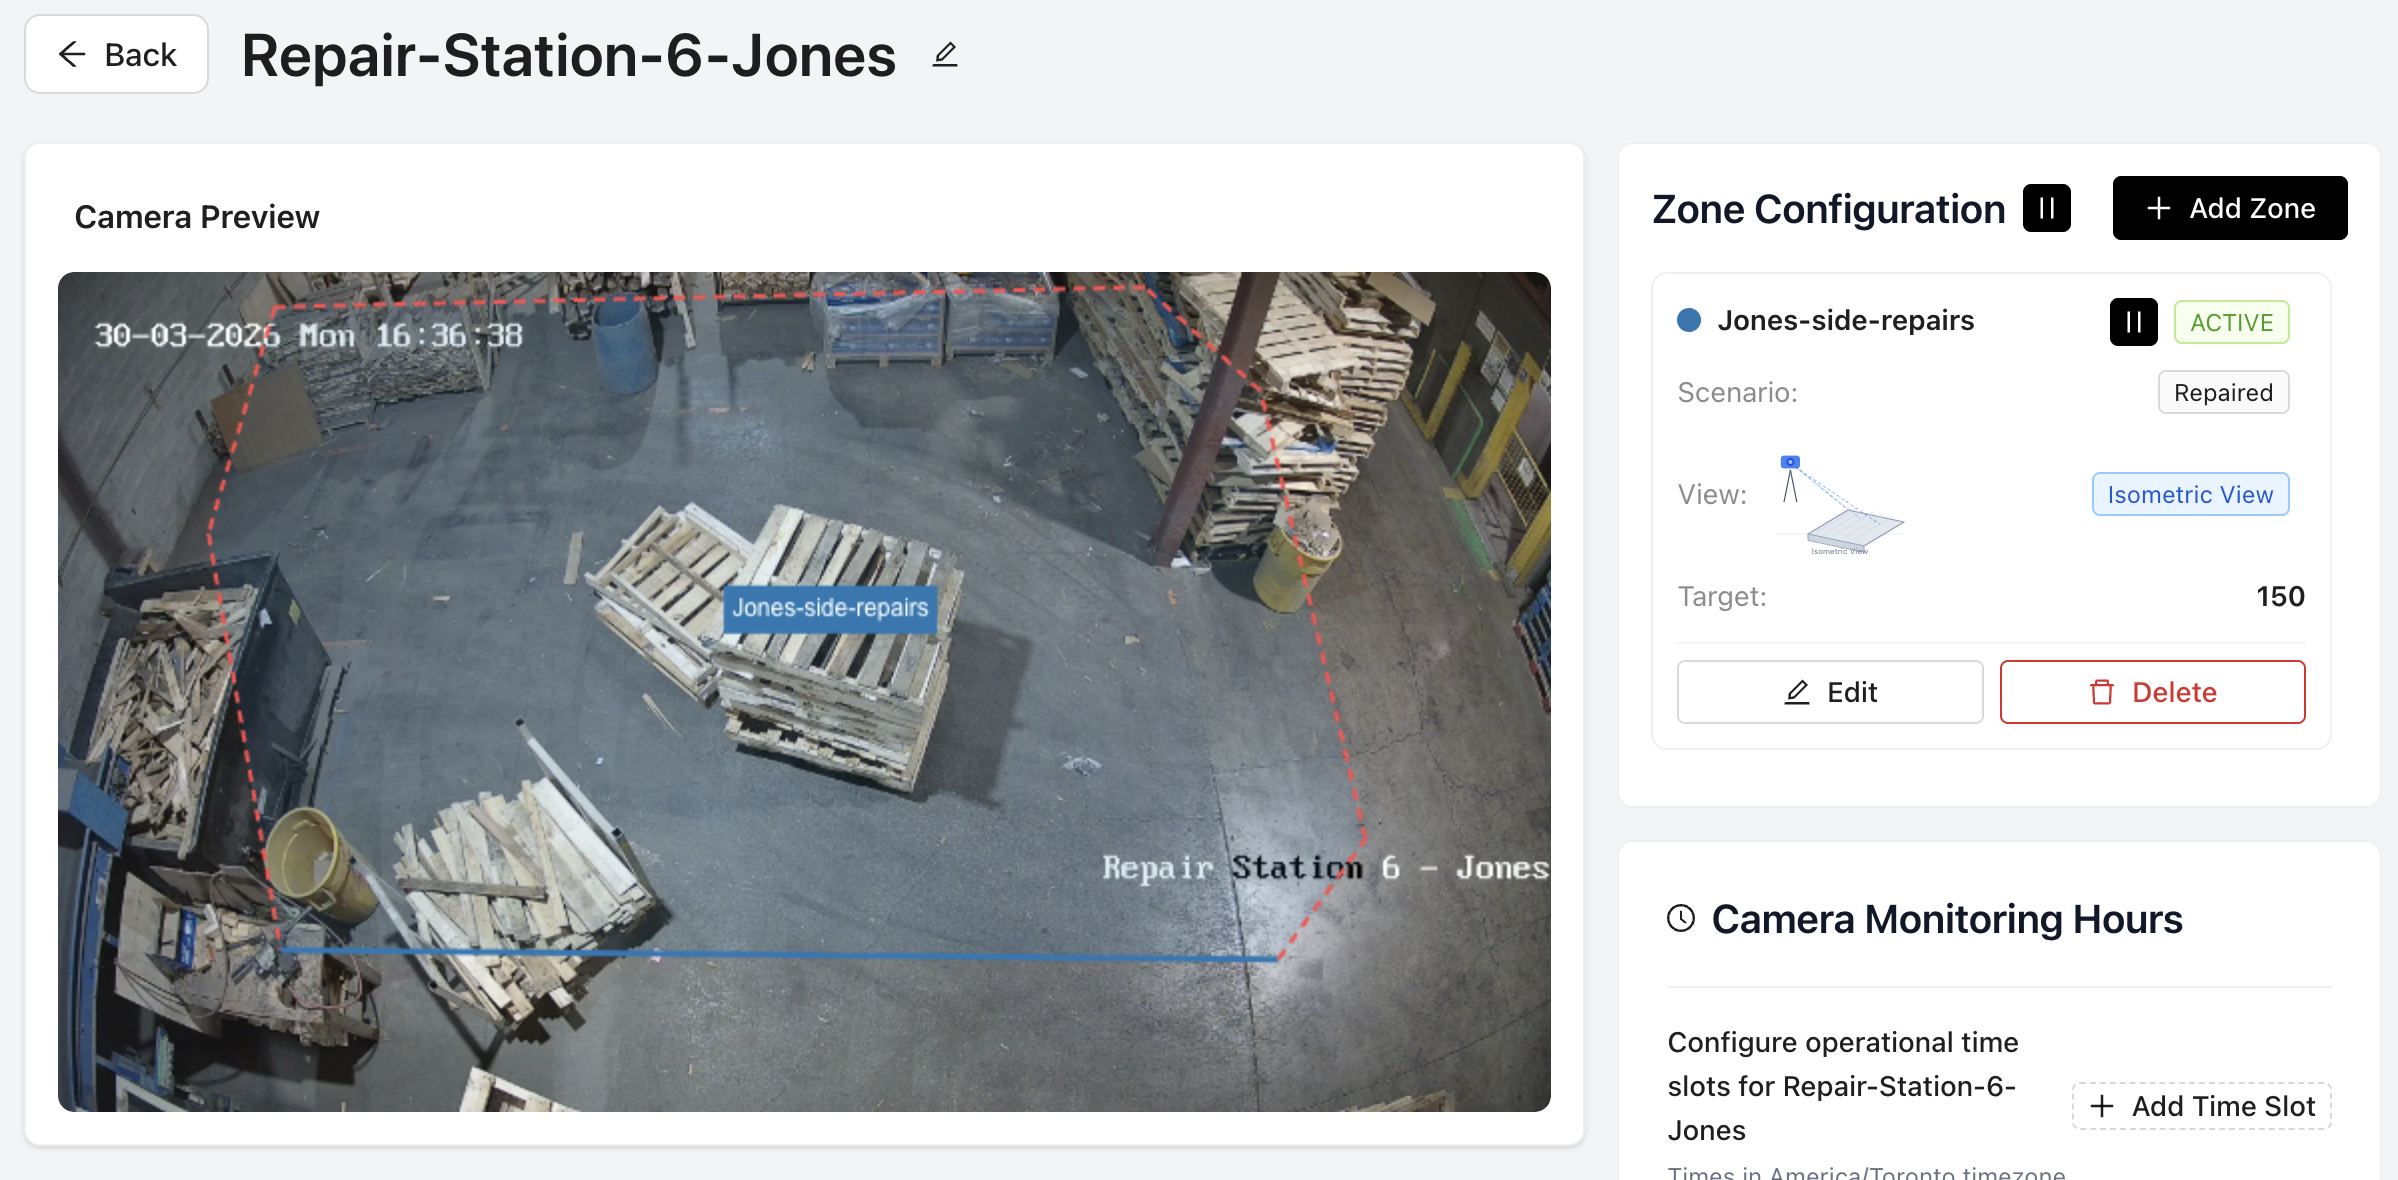
Step 3.3 — Place a Counting Line (Where Applicable)
- For scenarios requiring directional tracking (Nailing Machine, Dismantle), draw a counting line.
- The counting line should span the path pallets travel — any object crossing the line is counted.
- Ensure the line is perpendicular to pallet movement for highest accuracy.
Step 3.4 — Name the Zone
Assign a clear name: e.g., "Active Work Area", "Nailing Output Zone", "Trim Saw Cut Area". This name appears in all production reports and dashboard views.
Important: PalletVision only counts when a pallet enters the configured active zone. If production counts appear lower than expected, check that the zone covers the full pallet path and the counting line (if set) is correctly positioned.
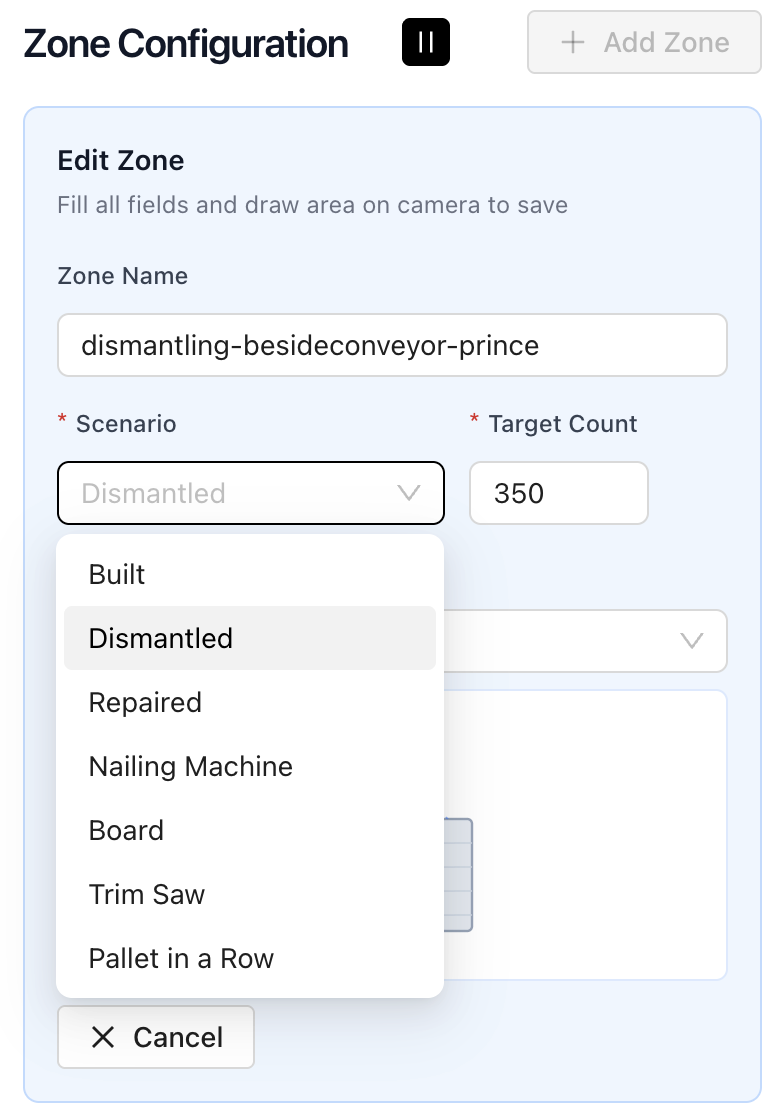
3.4 Step 4 — Assign AI Scenarios
Once zones are configured, assign one or more AI scenarios to each camera. The scenario tells the system what type of activity to detect and count.
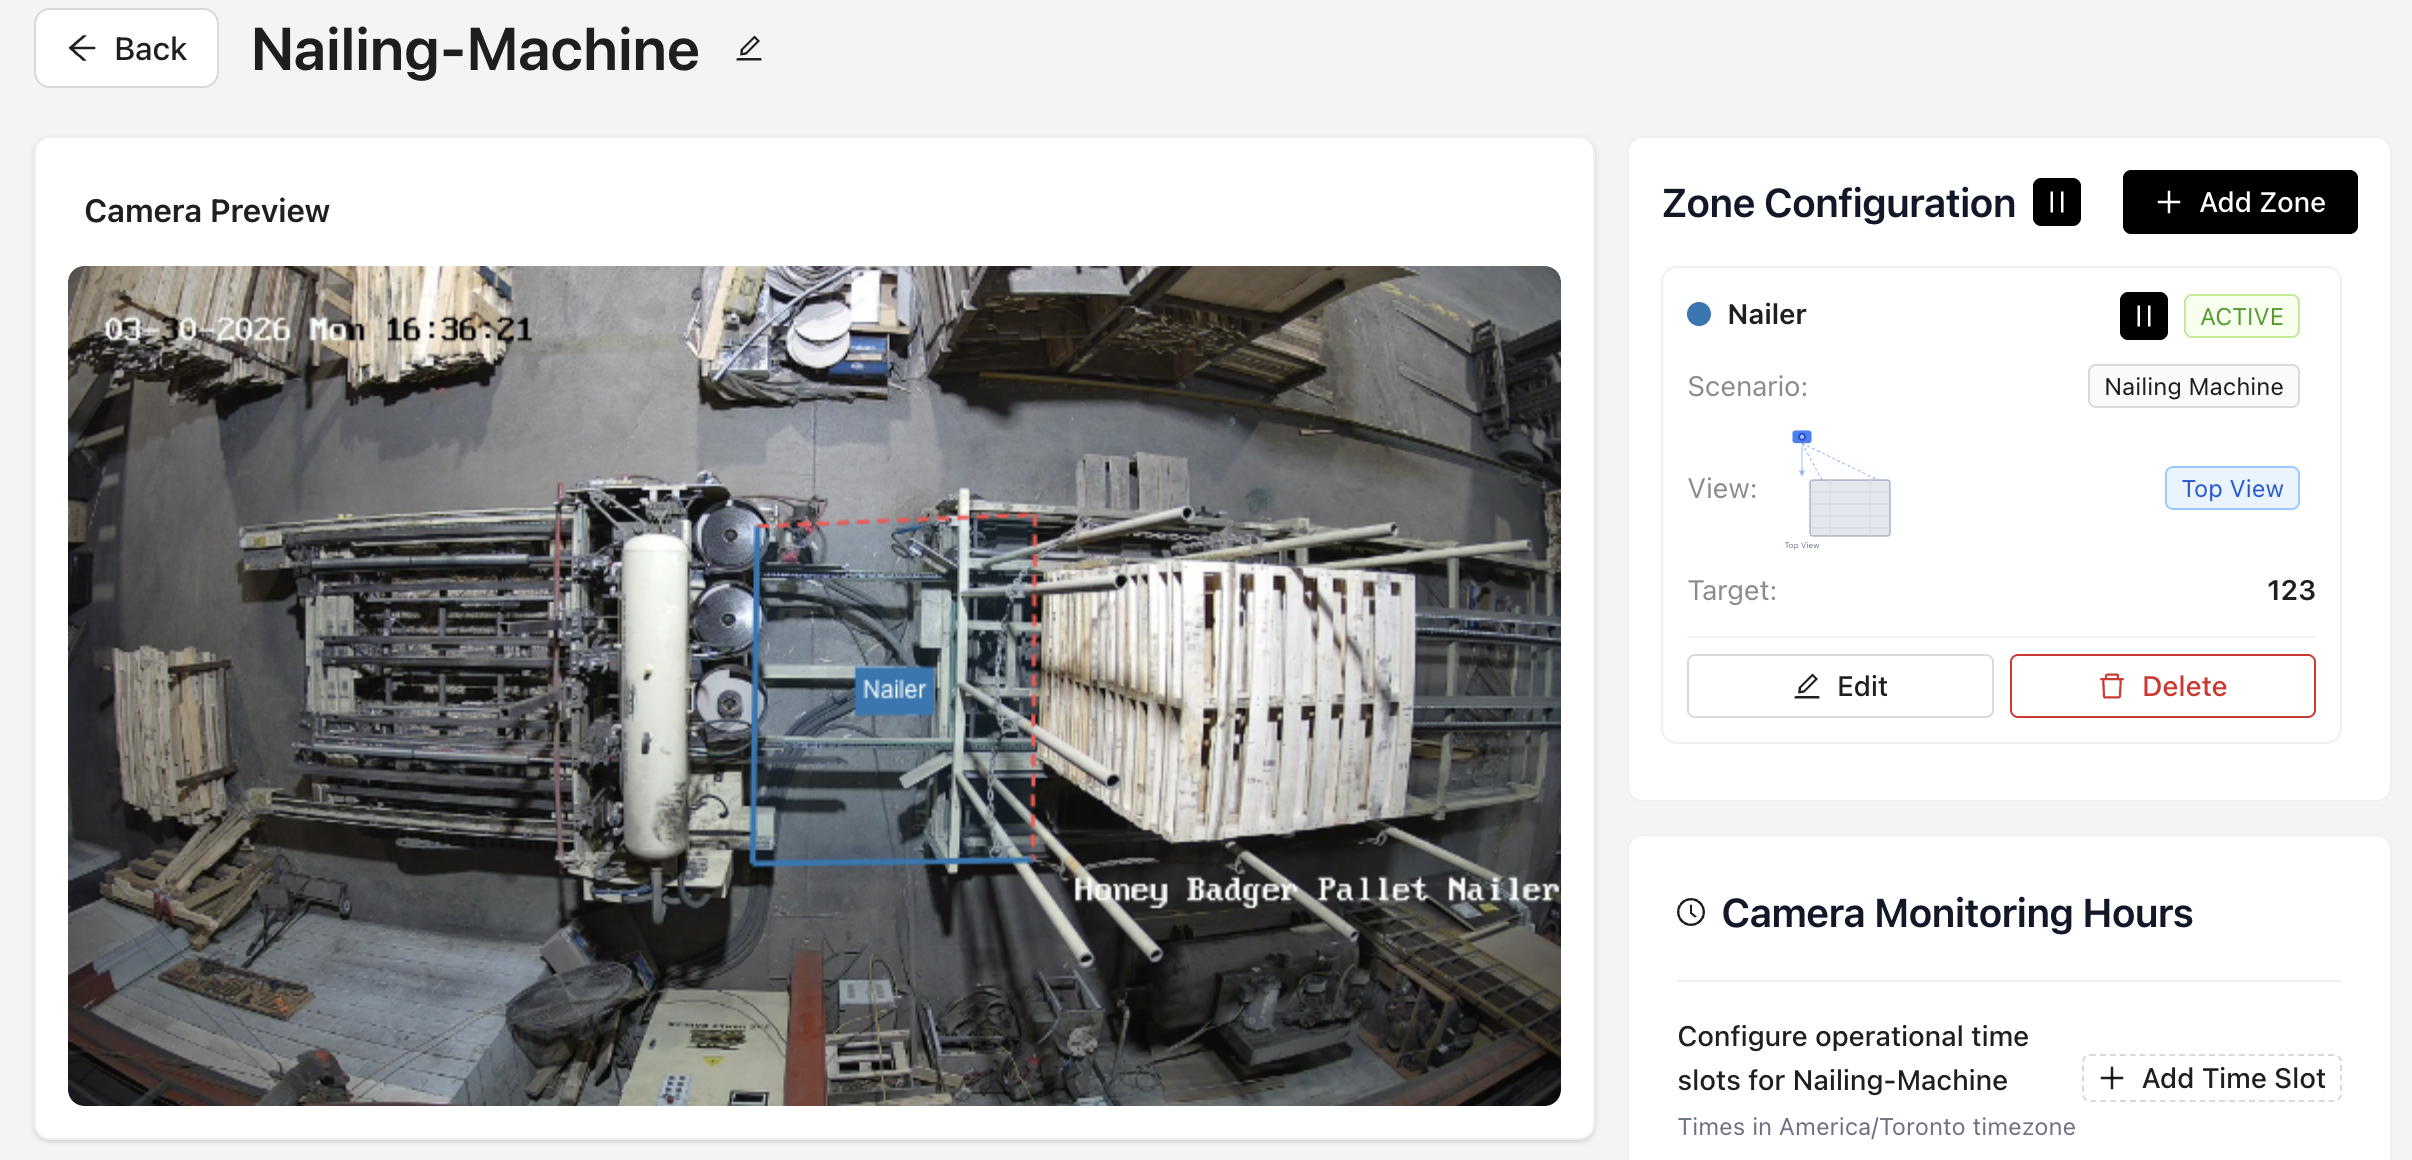
Step 4.1 — Select Scenarios
- In the zone editor, click Assign Scenario.
- Choose from: Pallet Build, Pallet Repair, Pallet Dismantle, Nailing Machine, Board Count, Trim Saw Count.
- Select the view for the camera: Top-Down or Isometric.
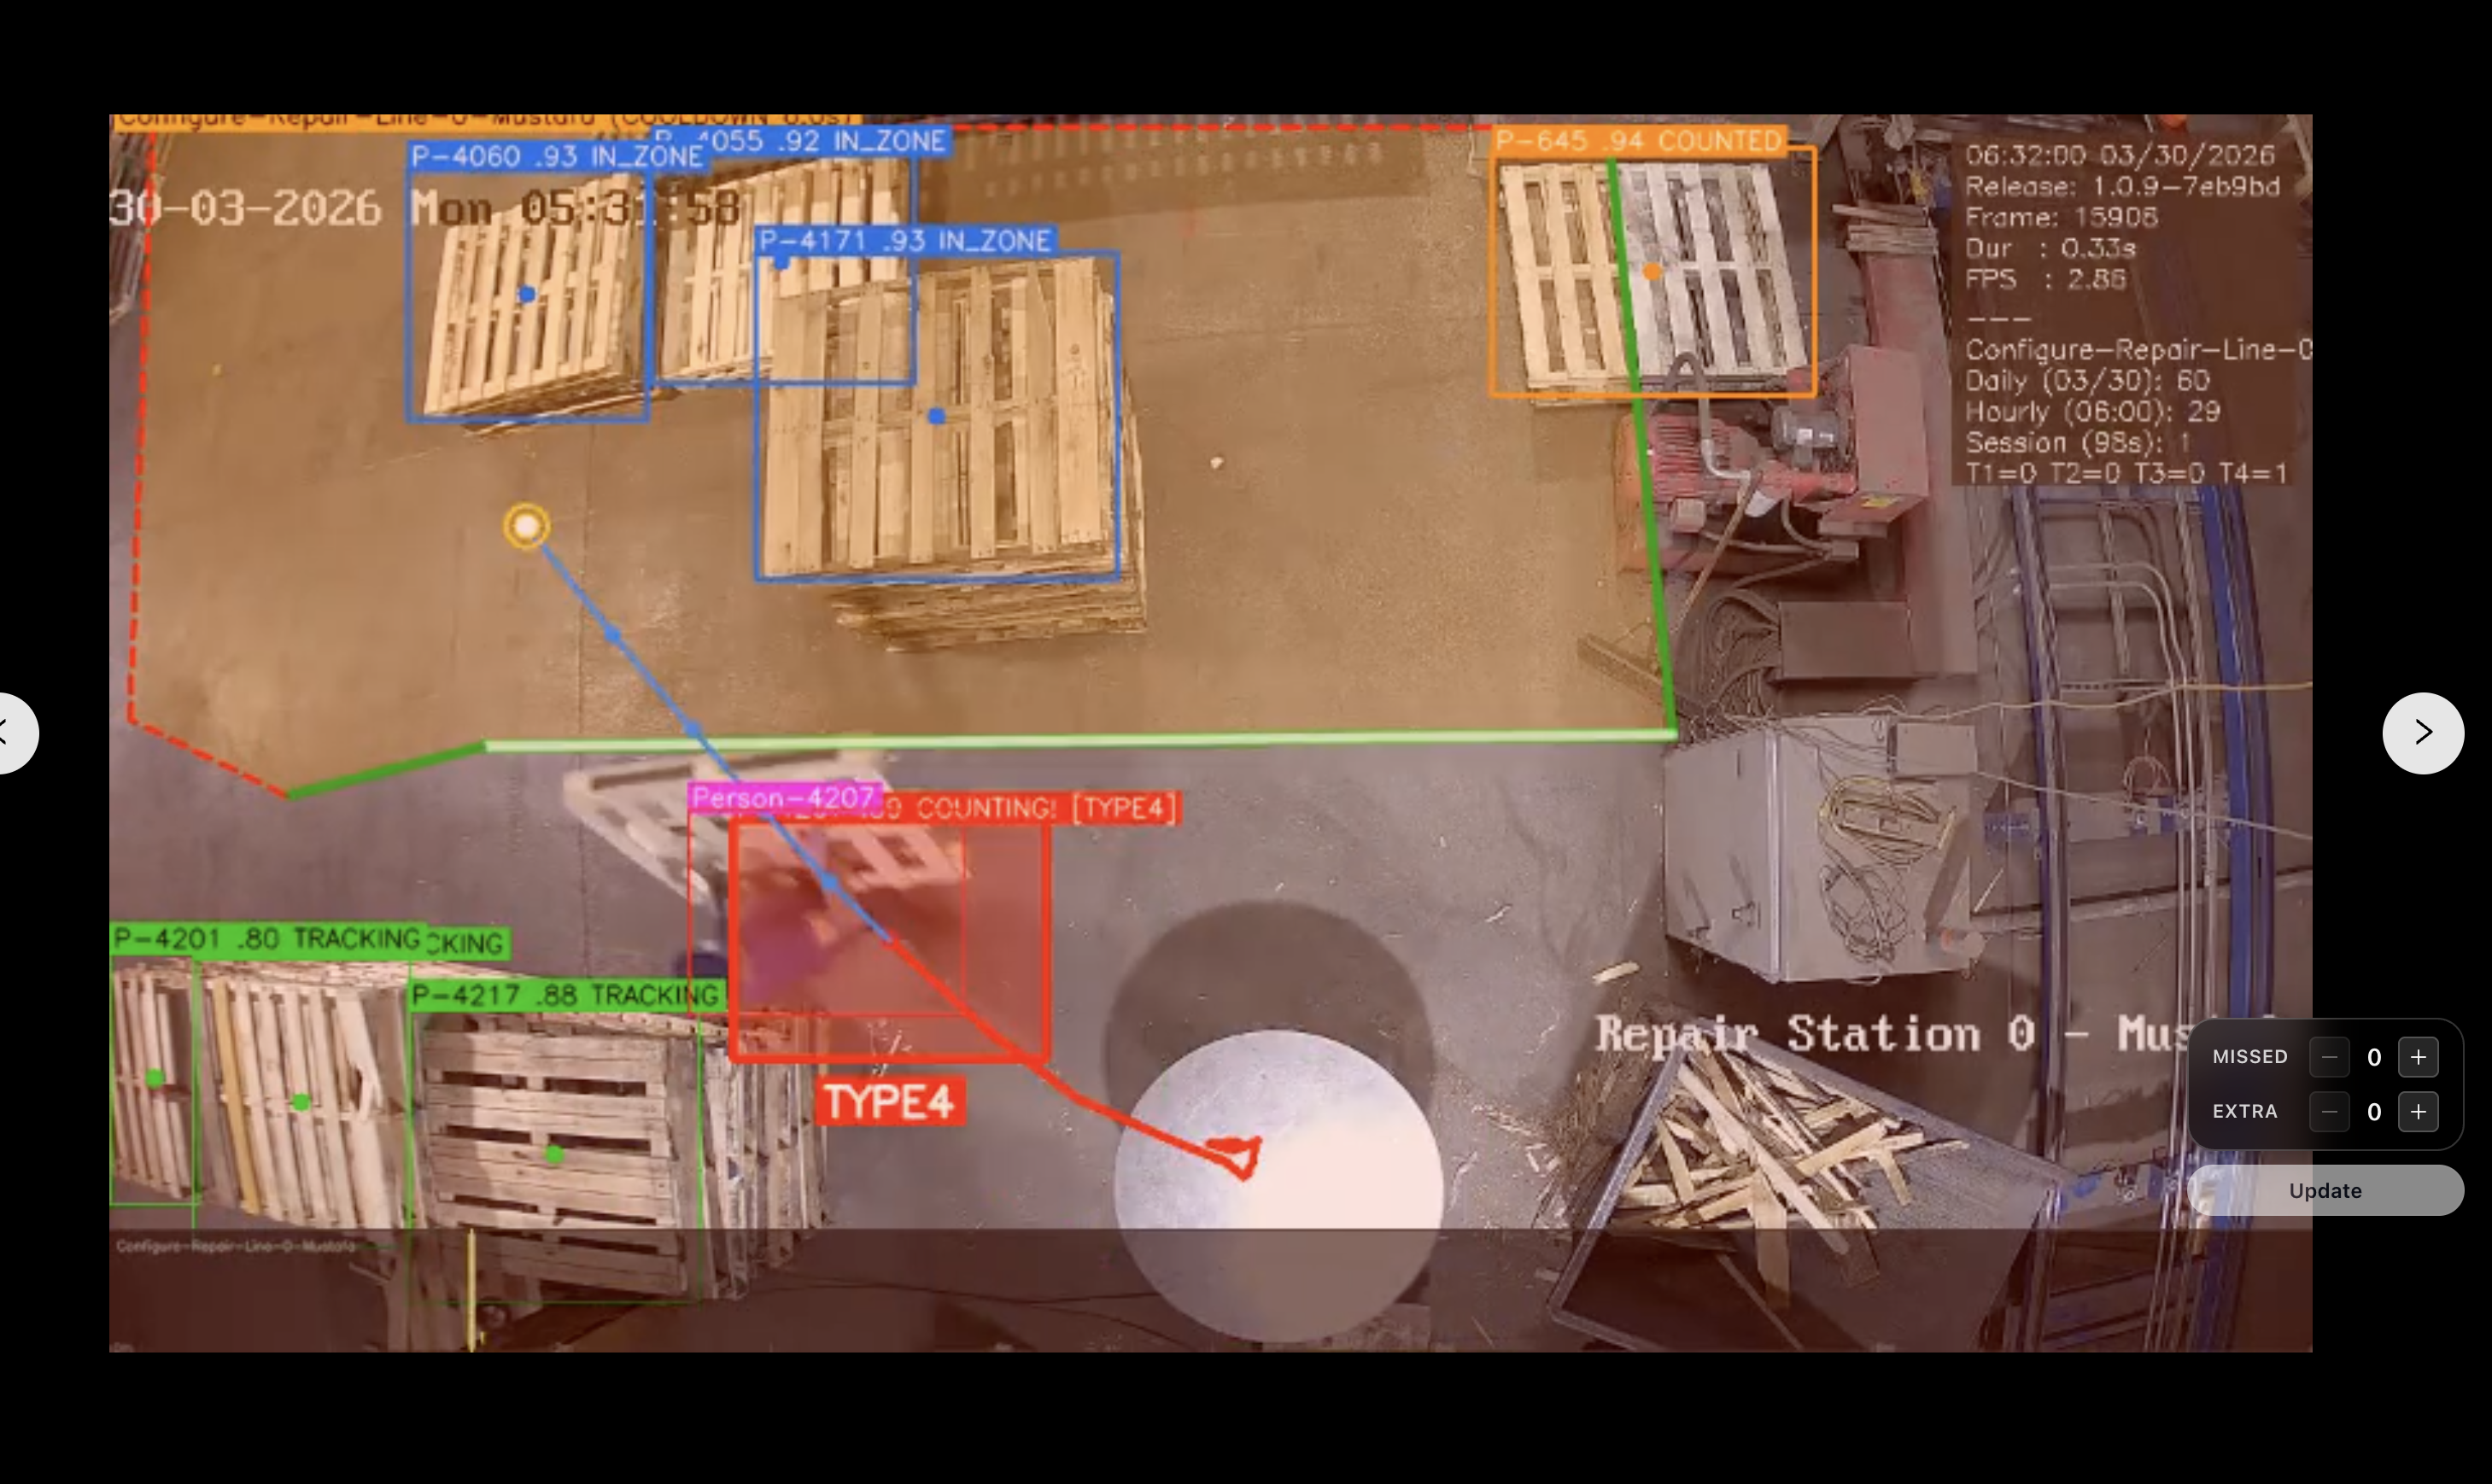
Step 4.2 — Activate and Verify
- Click Save & Activate.
- Observe the video clips generated — you should see AI detection overlays (bounding boxes or zone highlights).
- Trigger a test count by moving a pallet through the active zone and verify the count increments.

4. Dashboard & Daily Production Counts
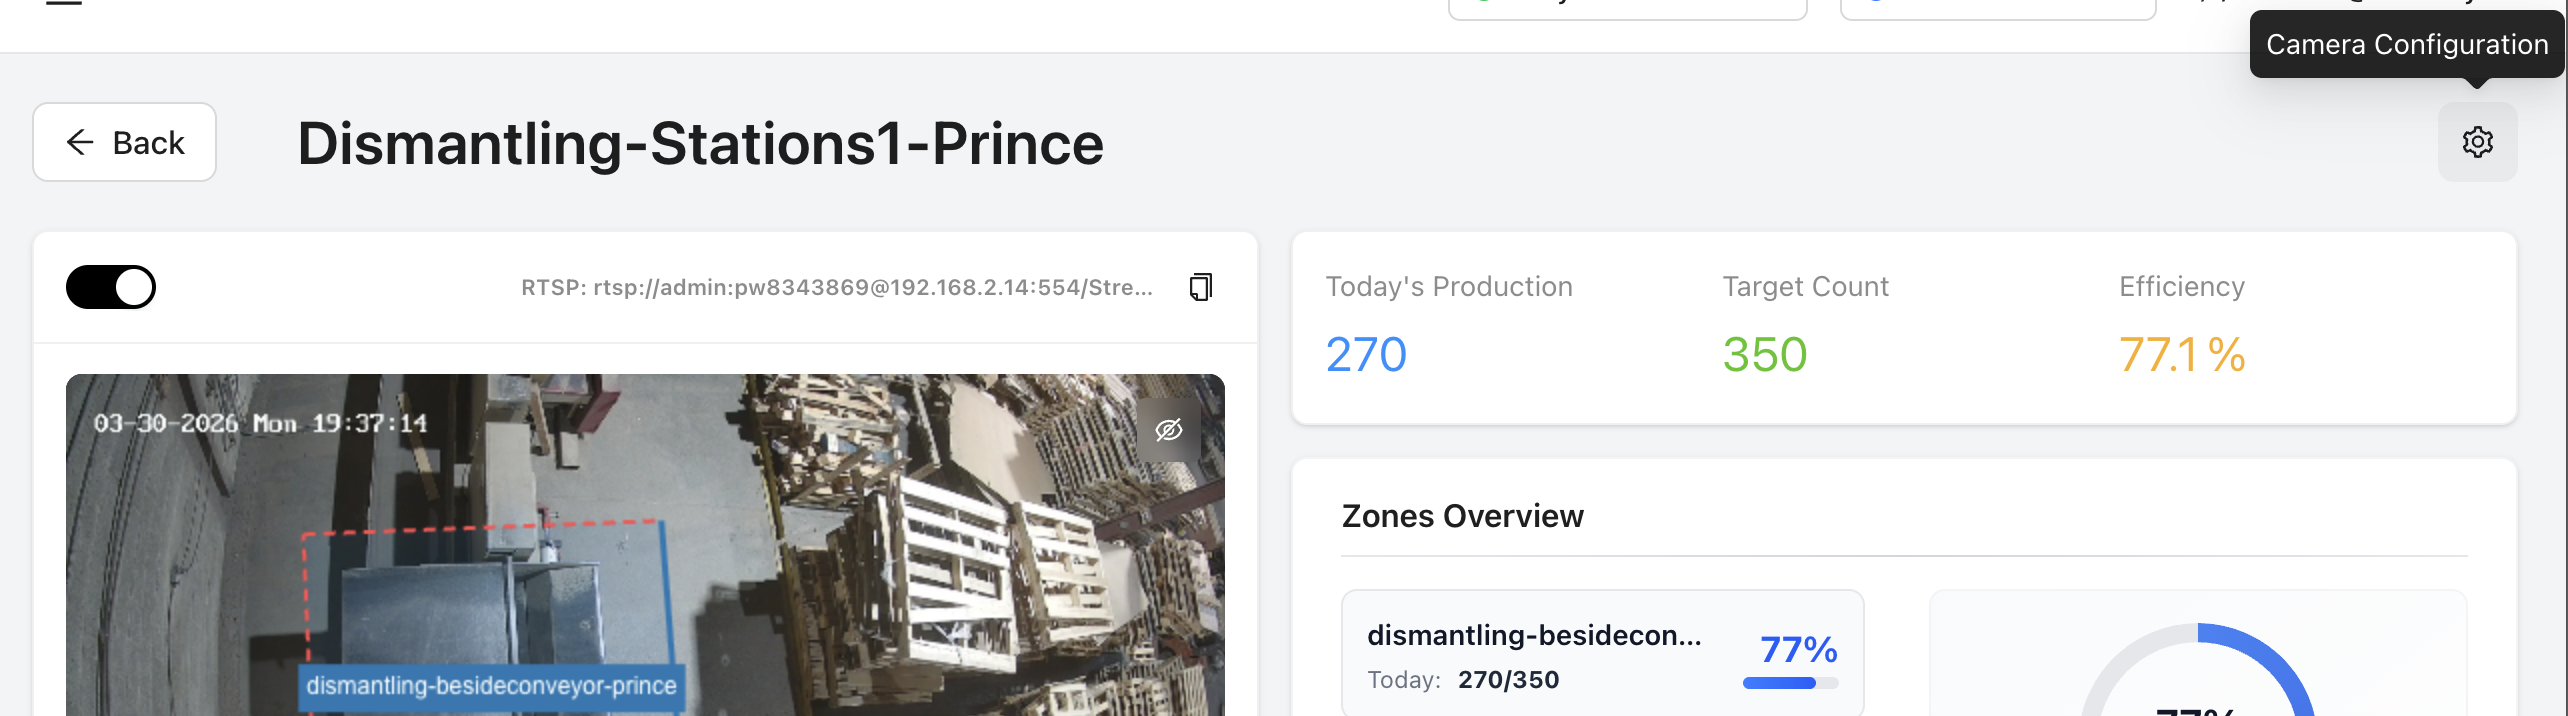
The PalletVision dashboard provides real-time and historical production data at every level — facility, shift, station, and individual camera. All views update live and are accessible from any web browser, including TVs mounted on the production floor.
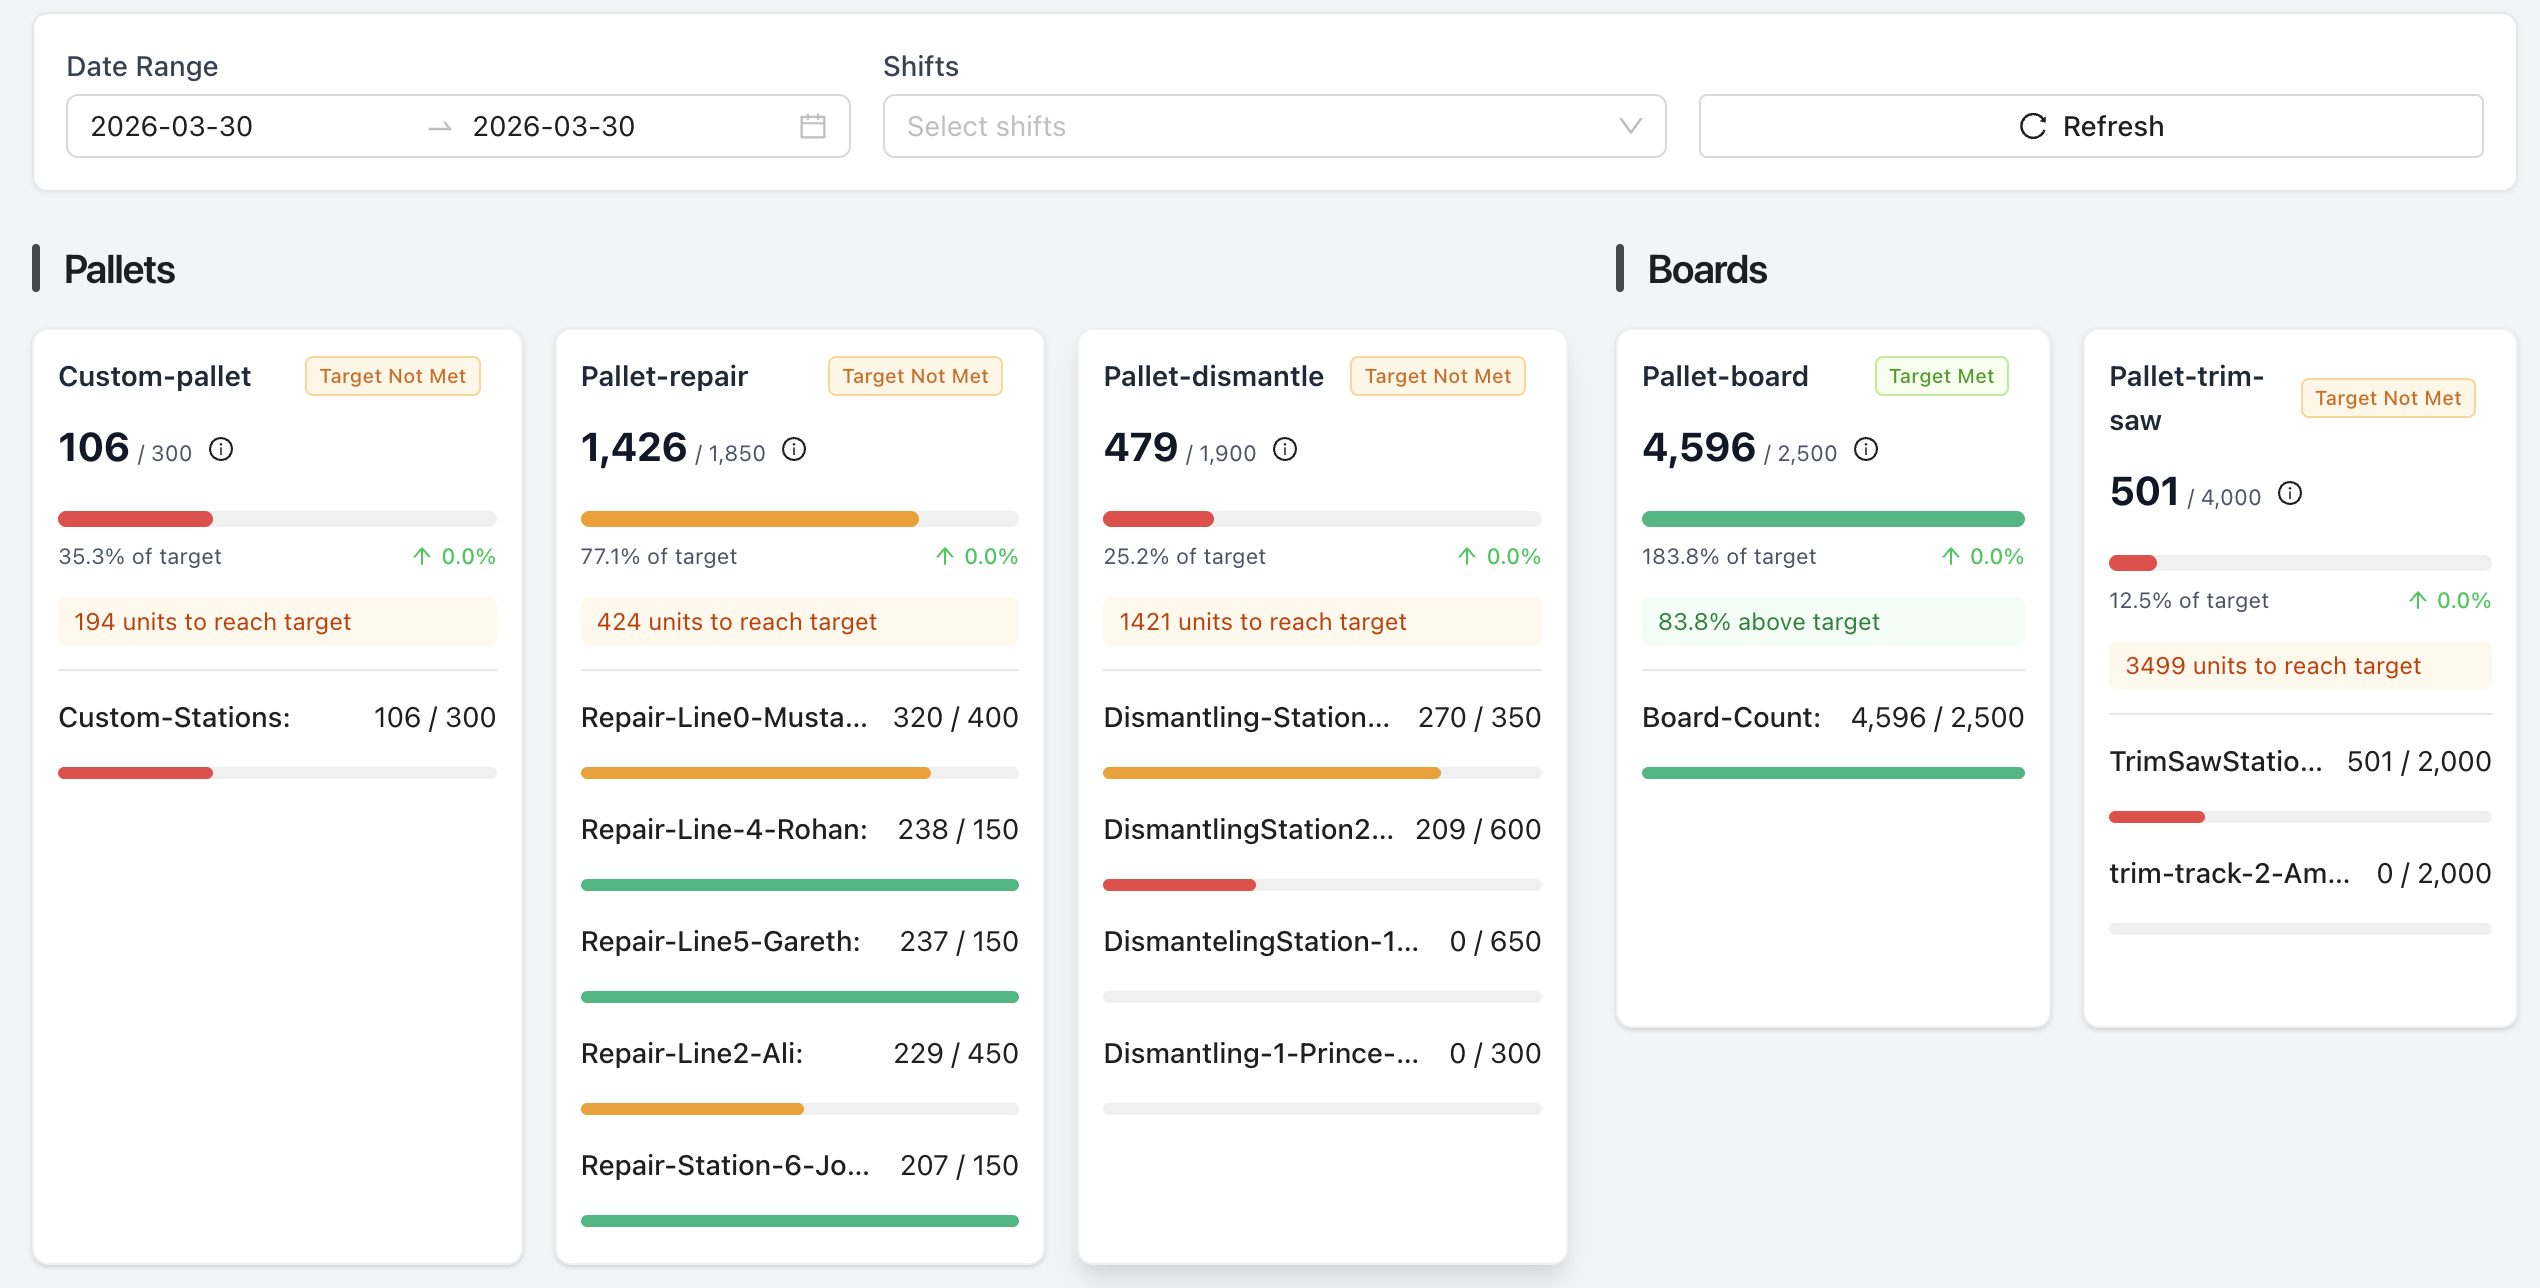
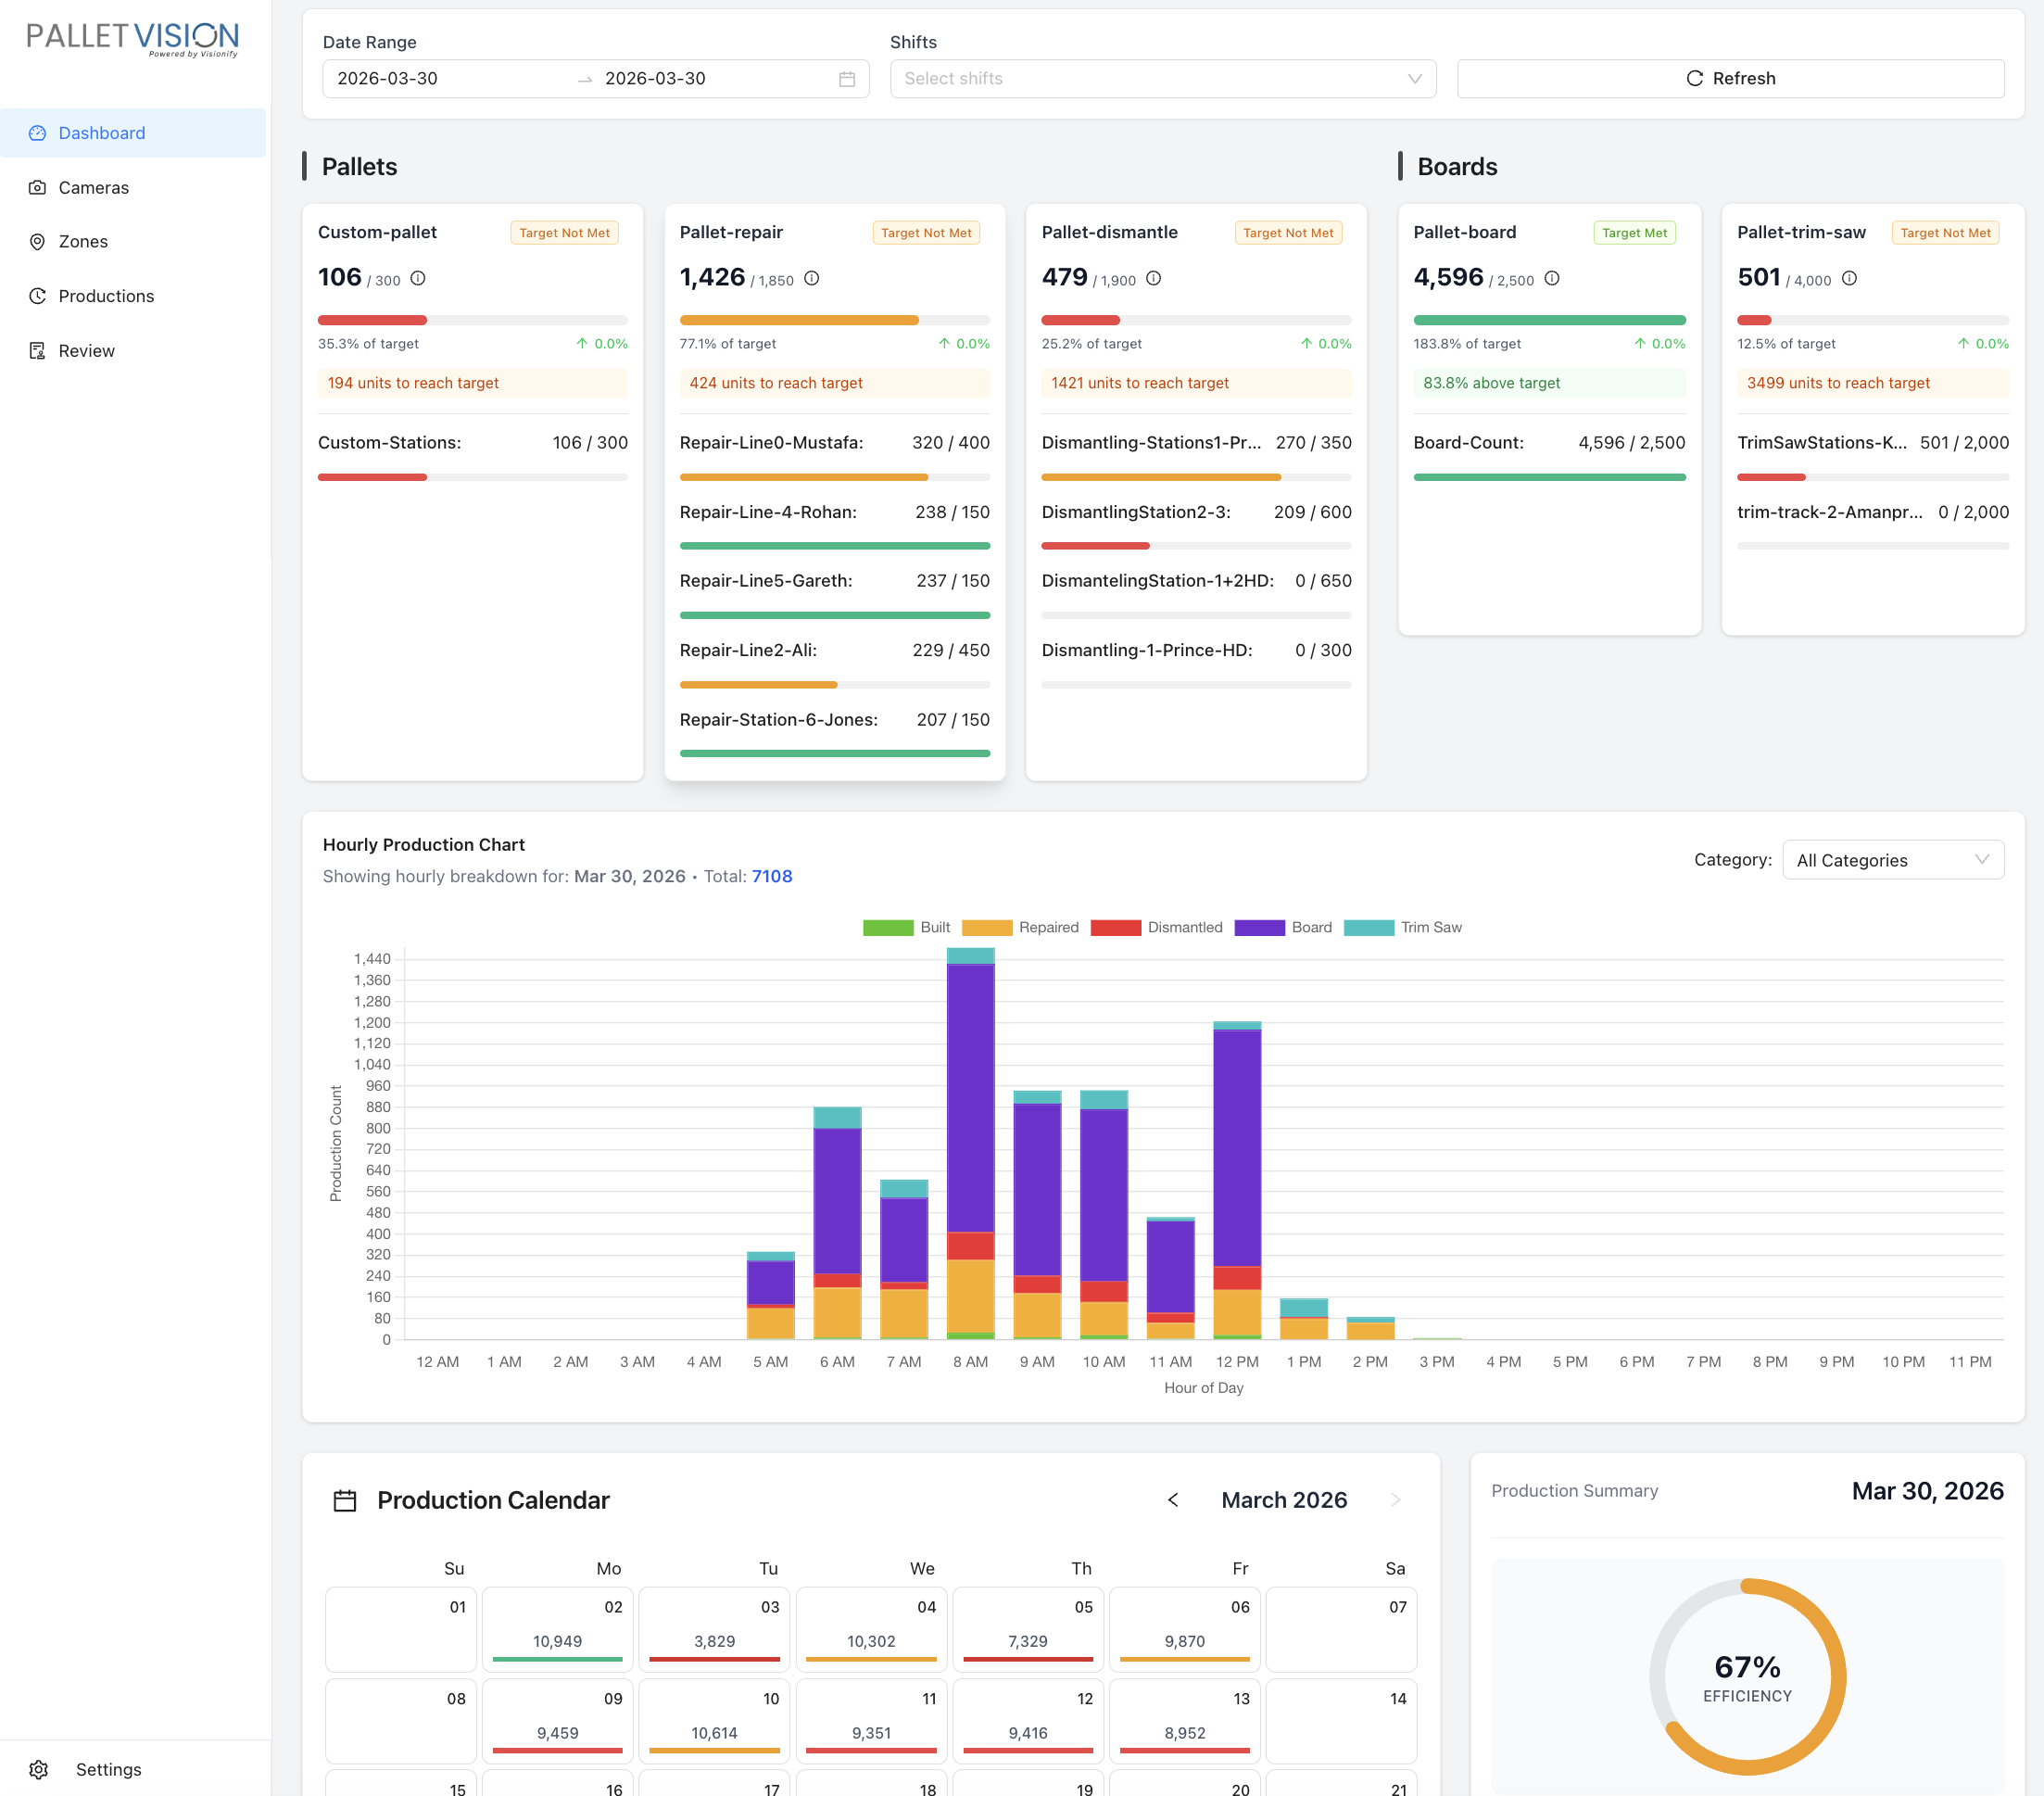
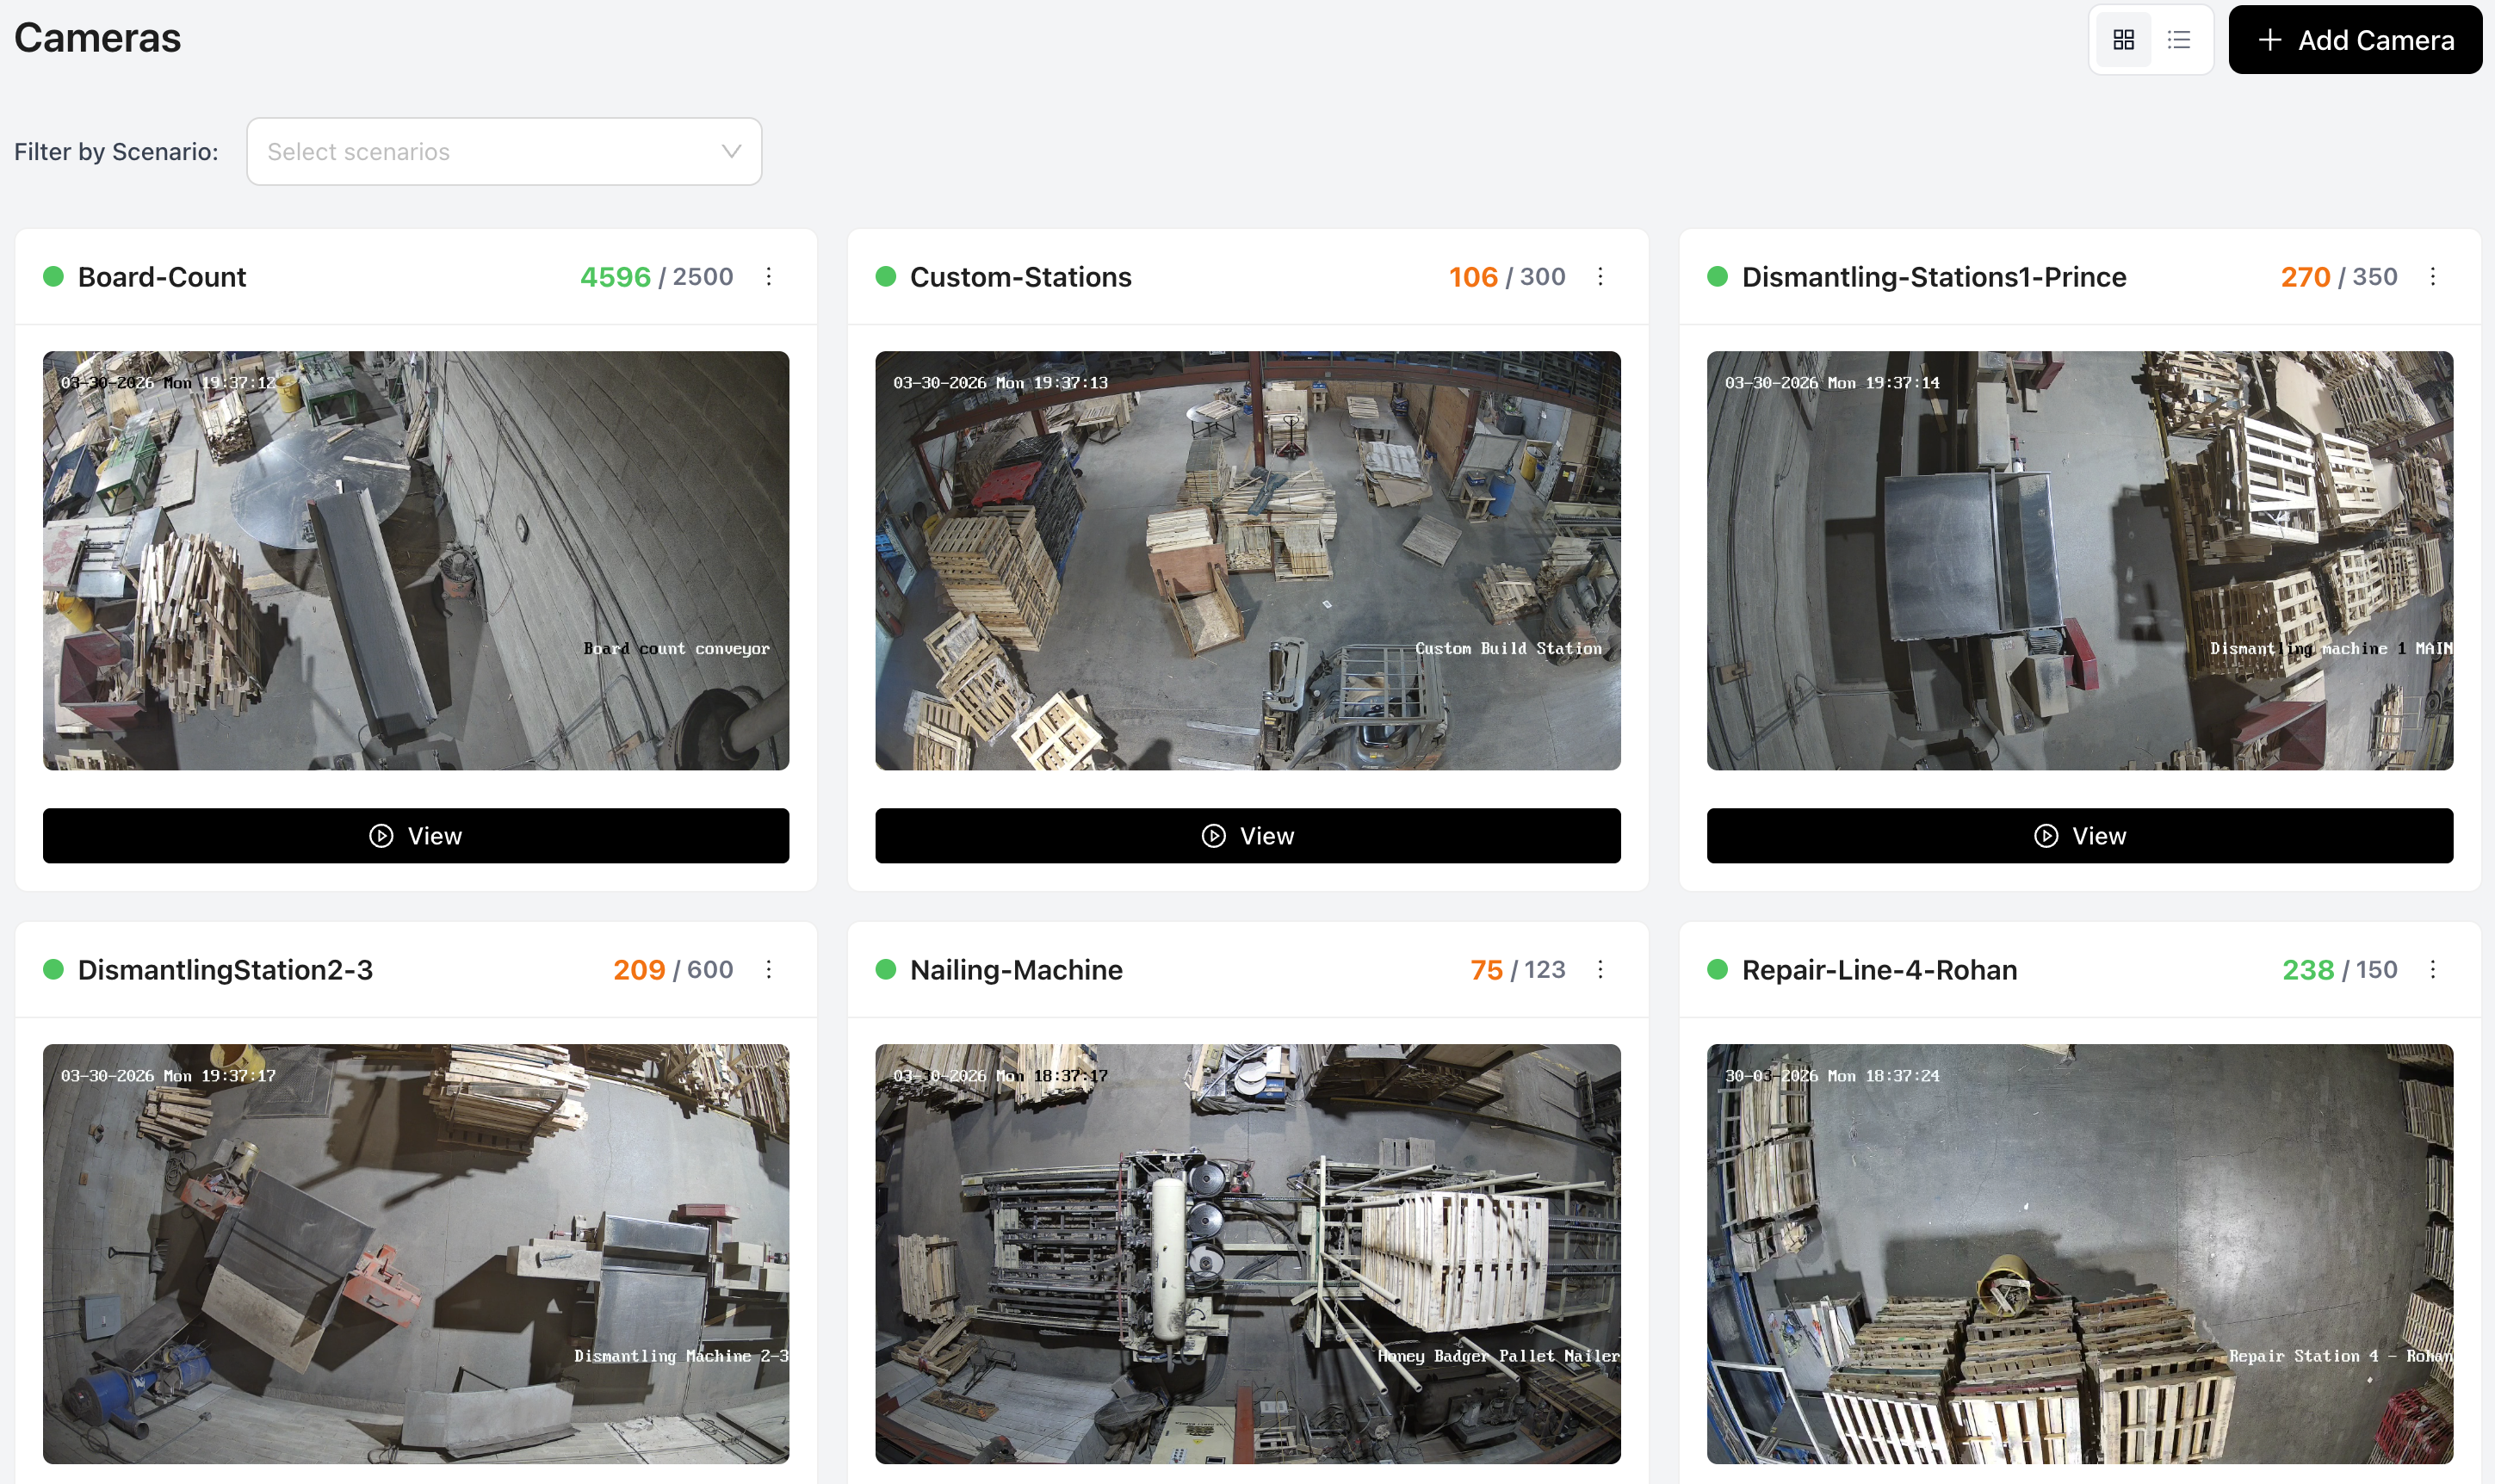
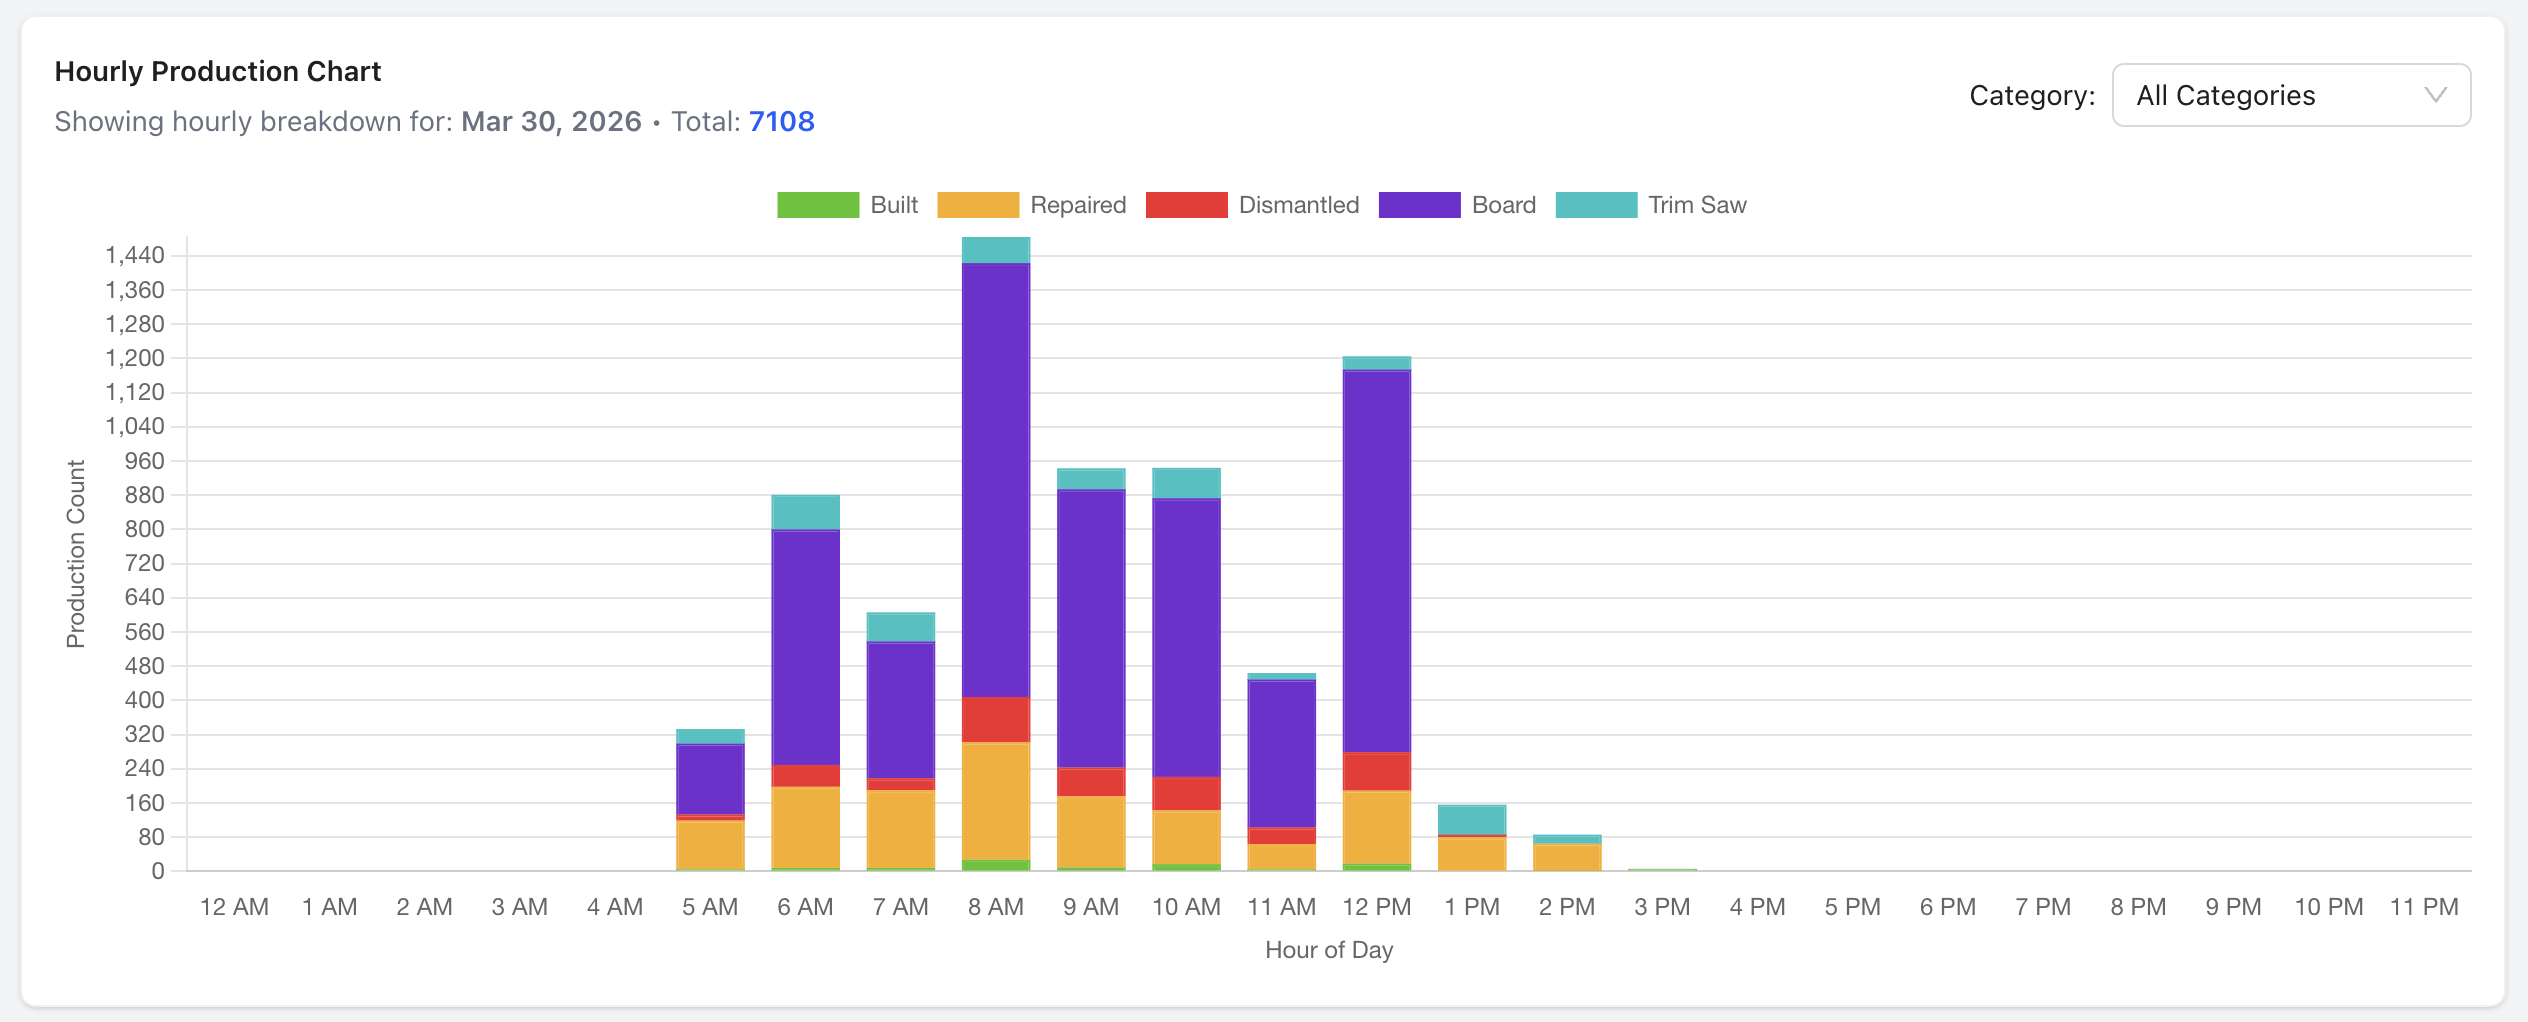
4.1 Main Production Dashboard
The main dashboard shows today's production at a glance. Use the date range selector, camera filter, zone filter, and shift filter to drill into specific data.
- Daily total counts by scenario (Build, Repair, Dismantle, etc.)
- Hourly stacked bar chart — spot peak hours and shift transitions
- Target vs. actual comparison with color-coded performance indicators
- Flat-file export button for manual ERP reconciliation or reporting
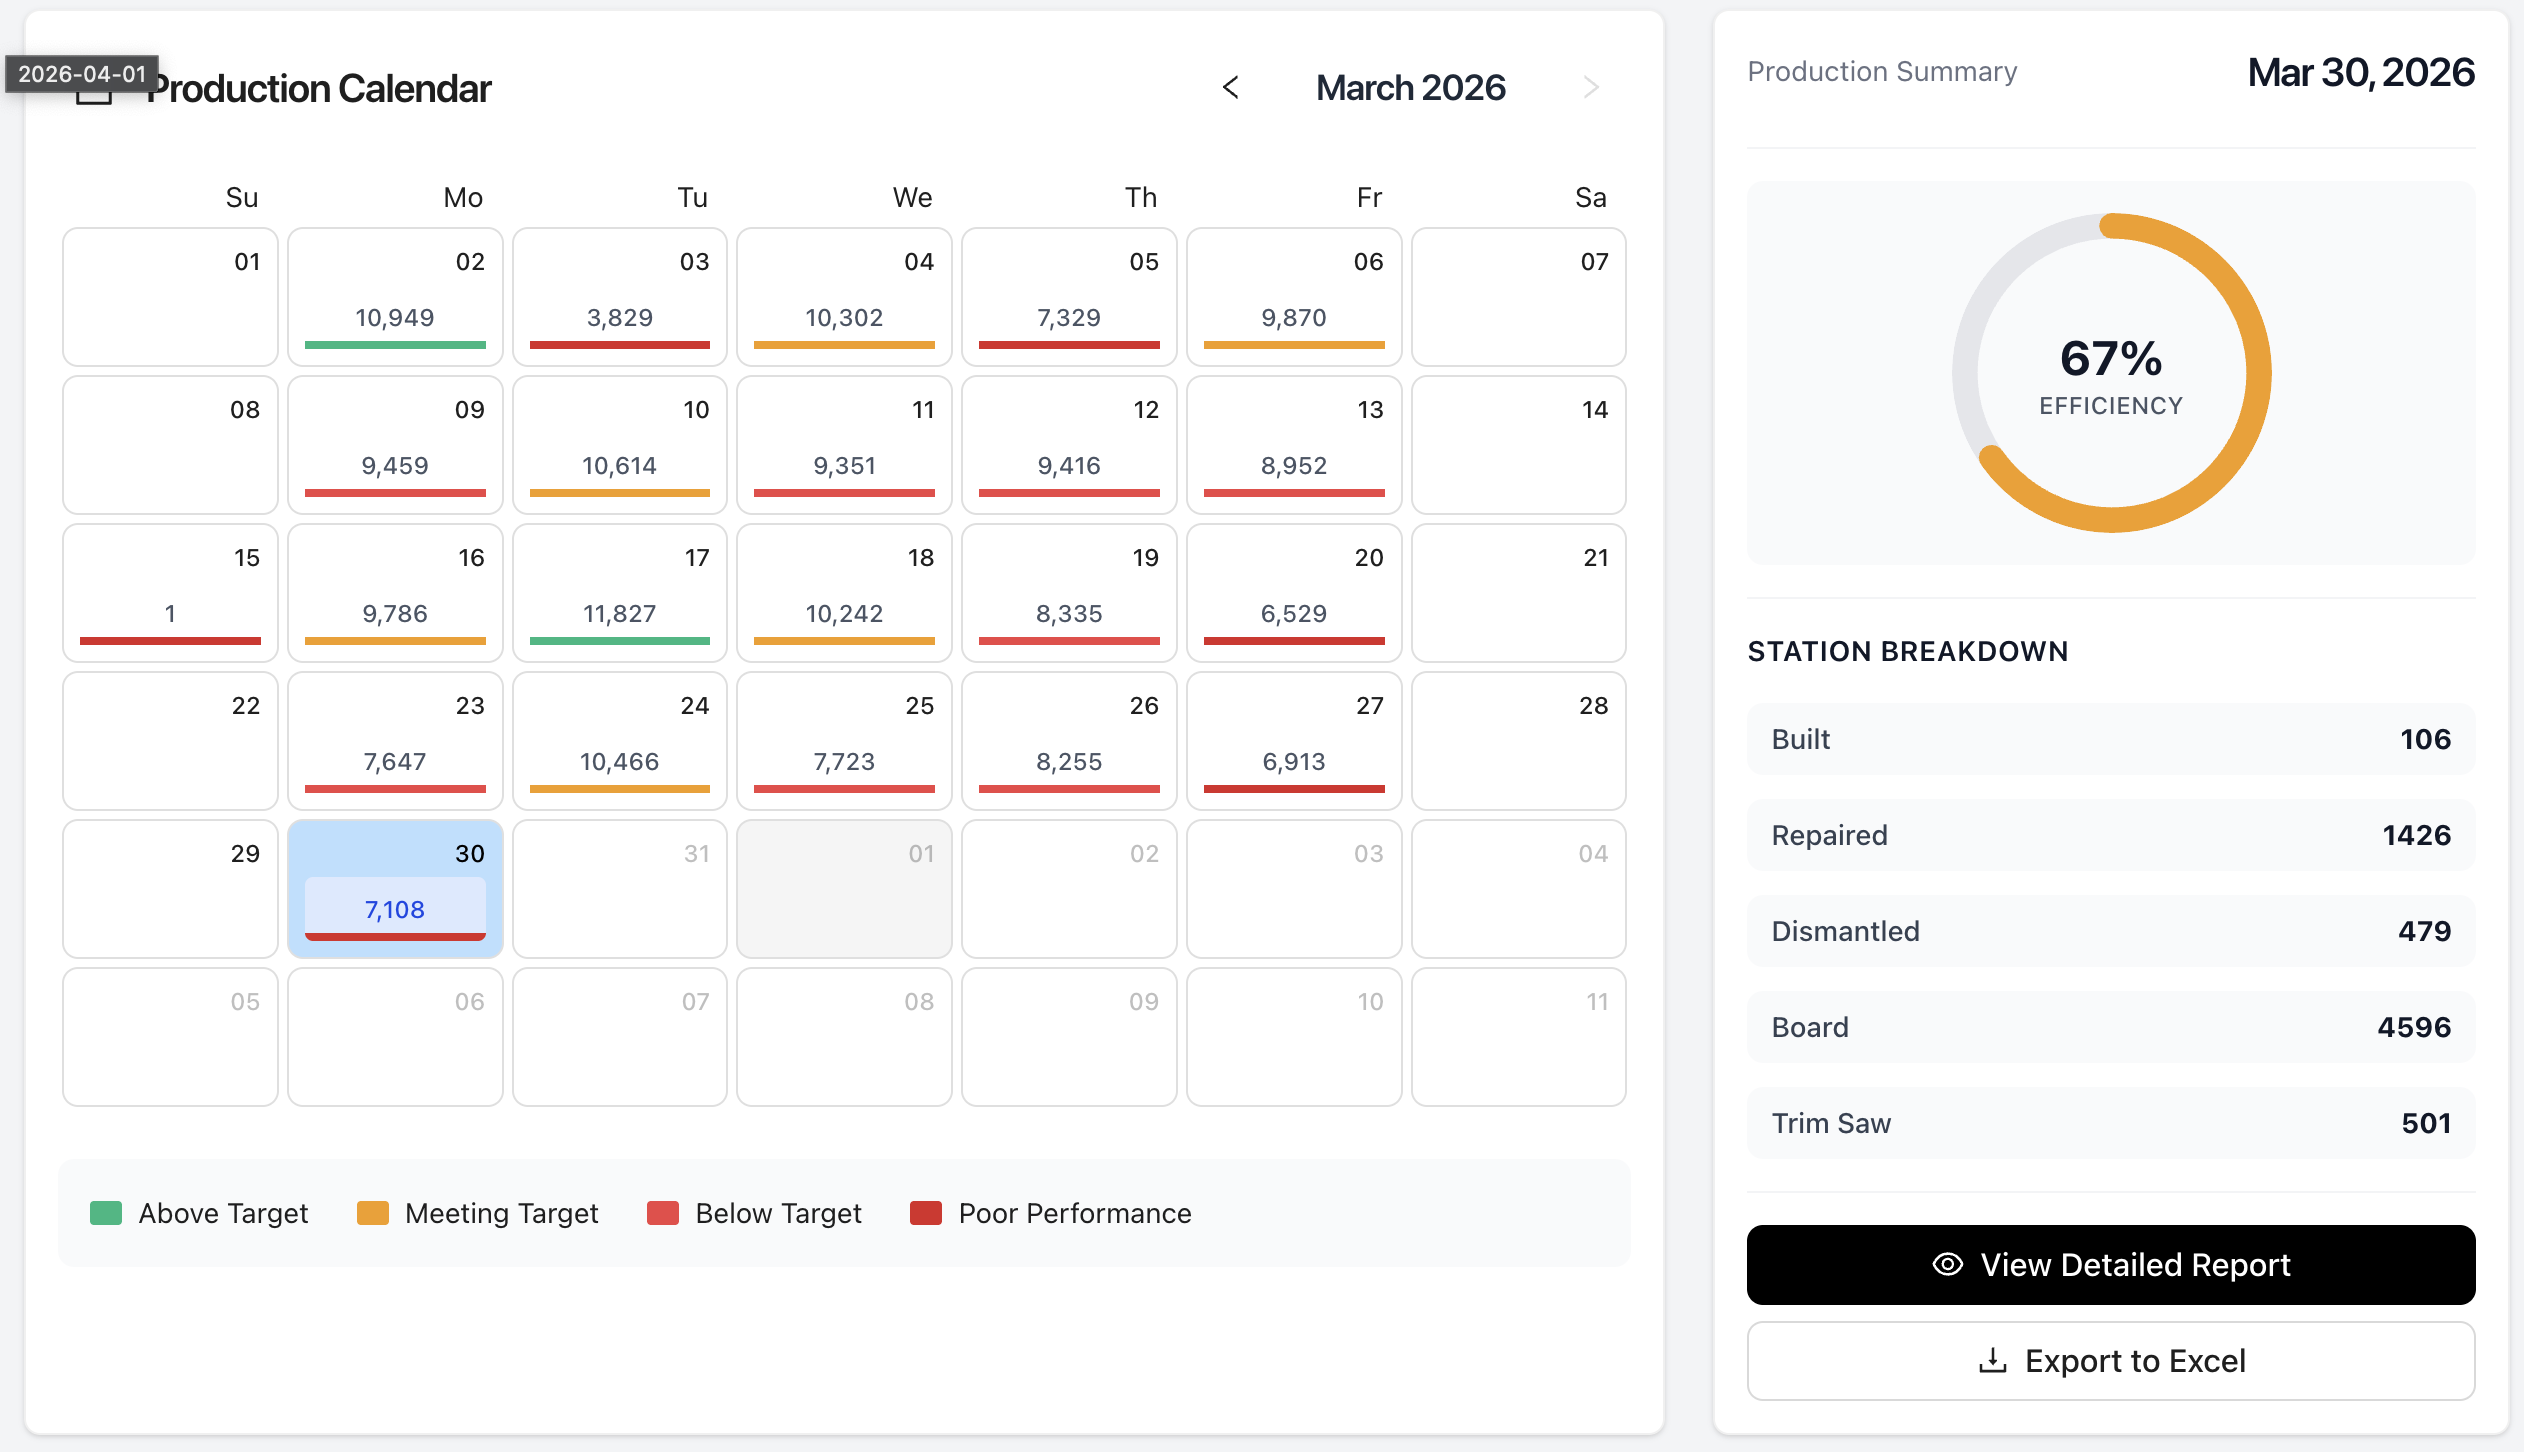
4.2 Production Calendar
The calendar view shows one month at a time with color-coded day tiles — green for days that met target, yellow for partial, red for below target. A daily efficiency gauge sits alongside the calendar to show the trend at a glance.
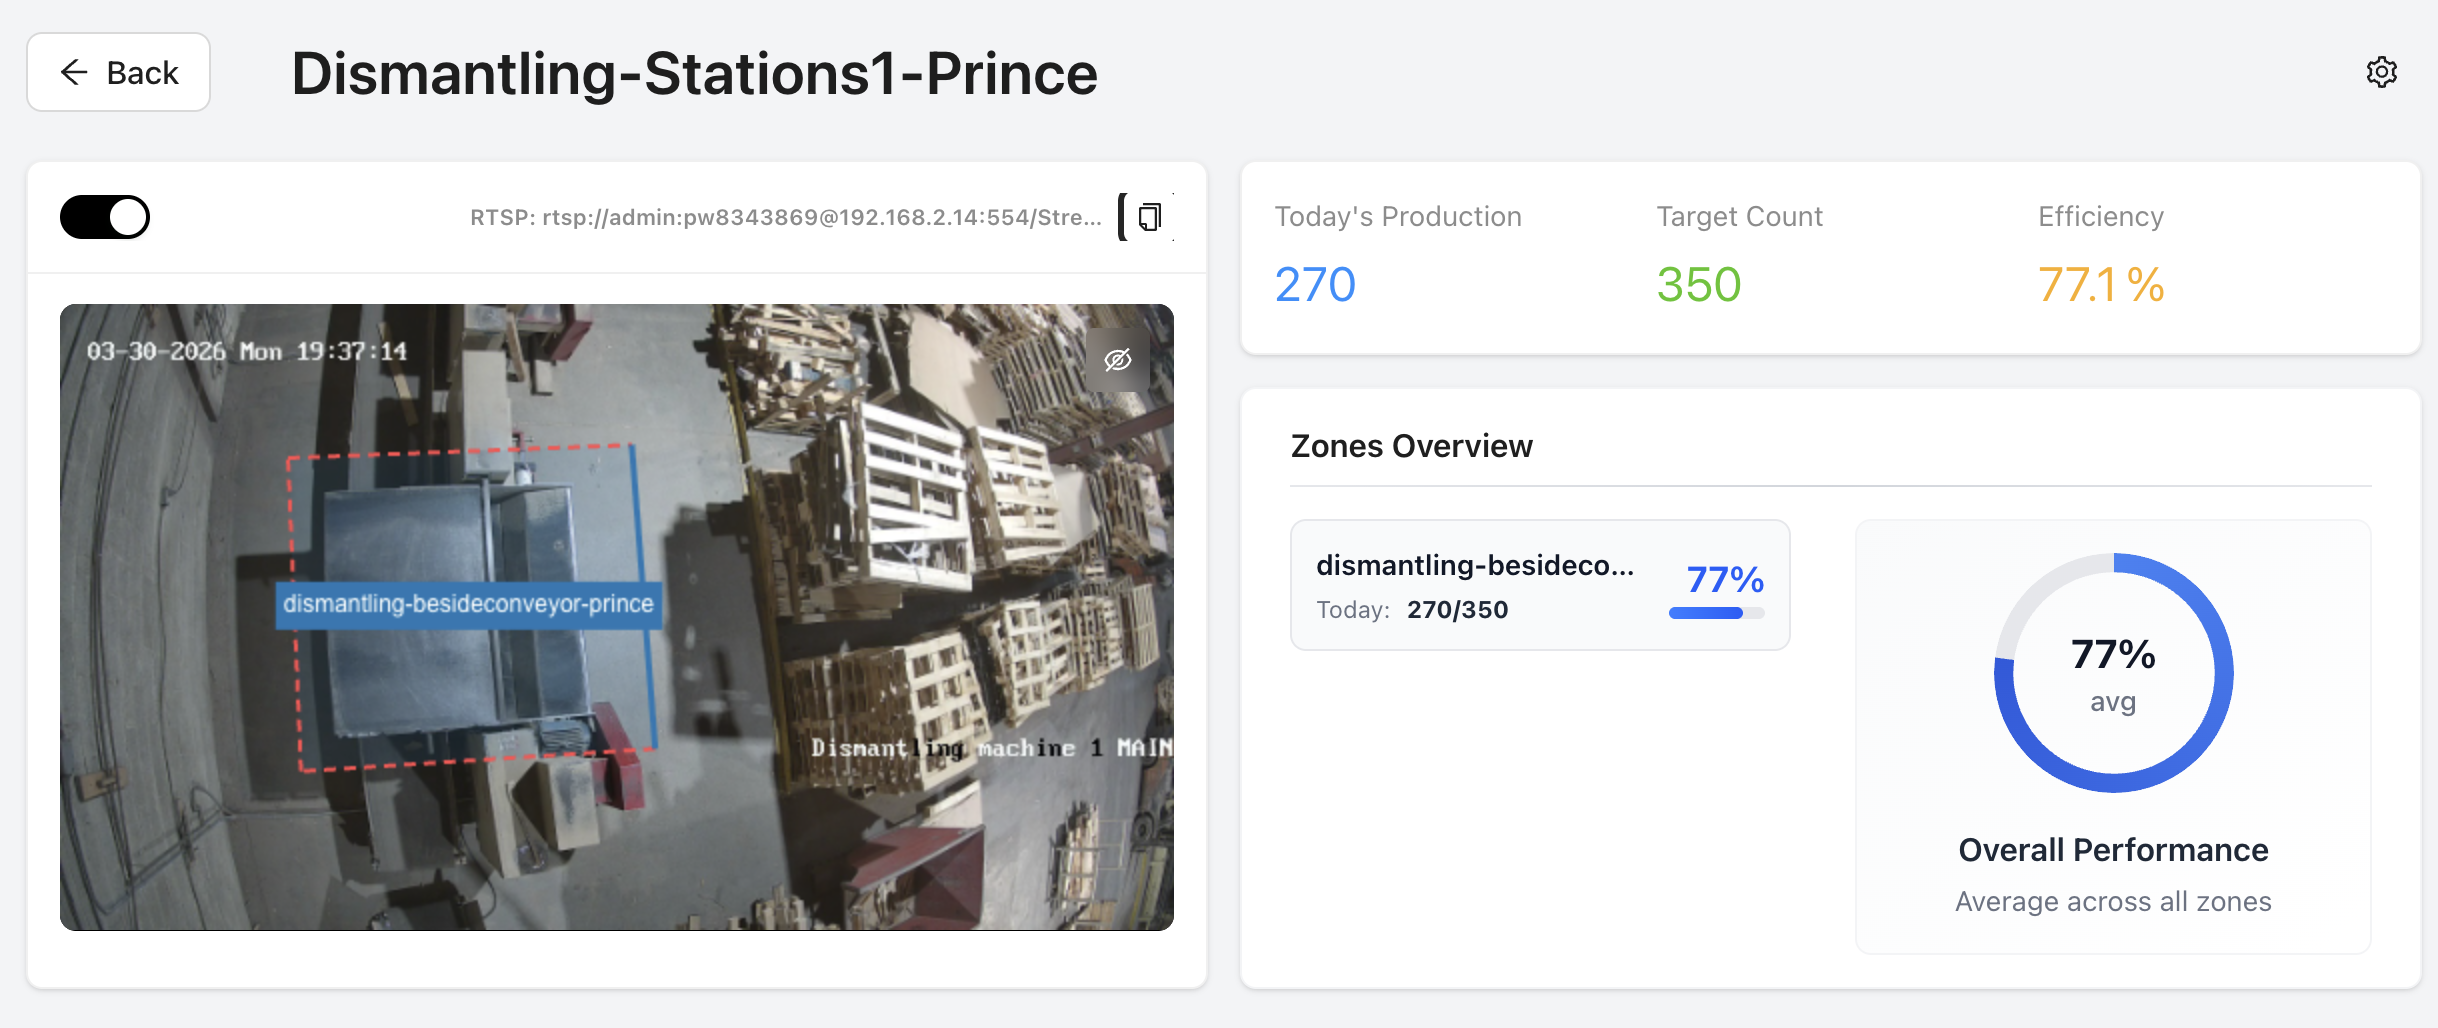
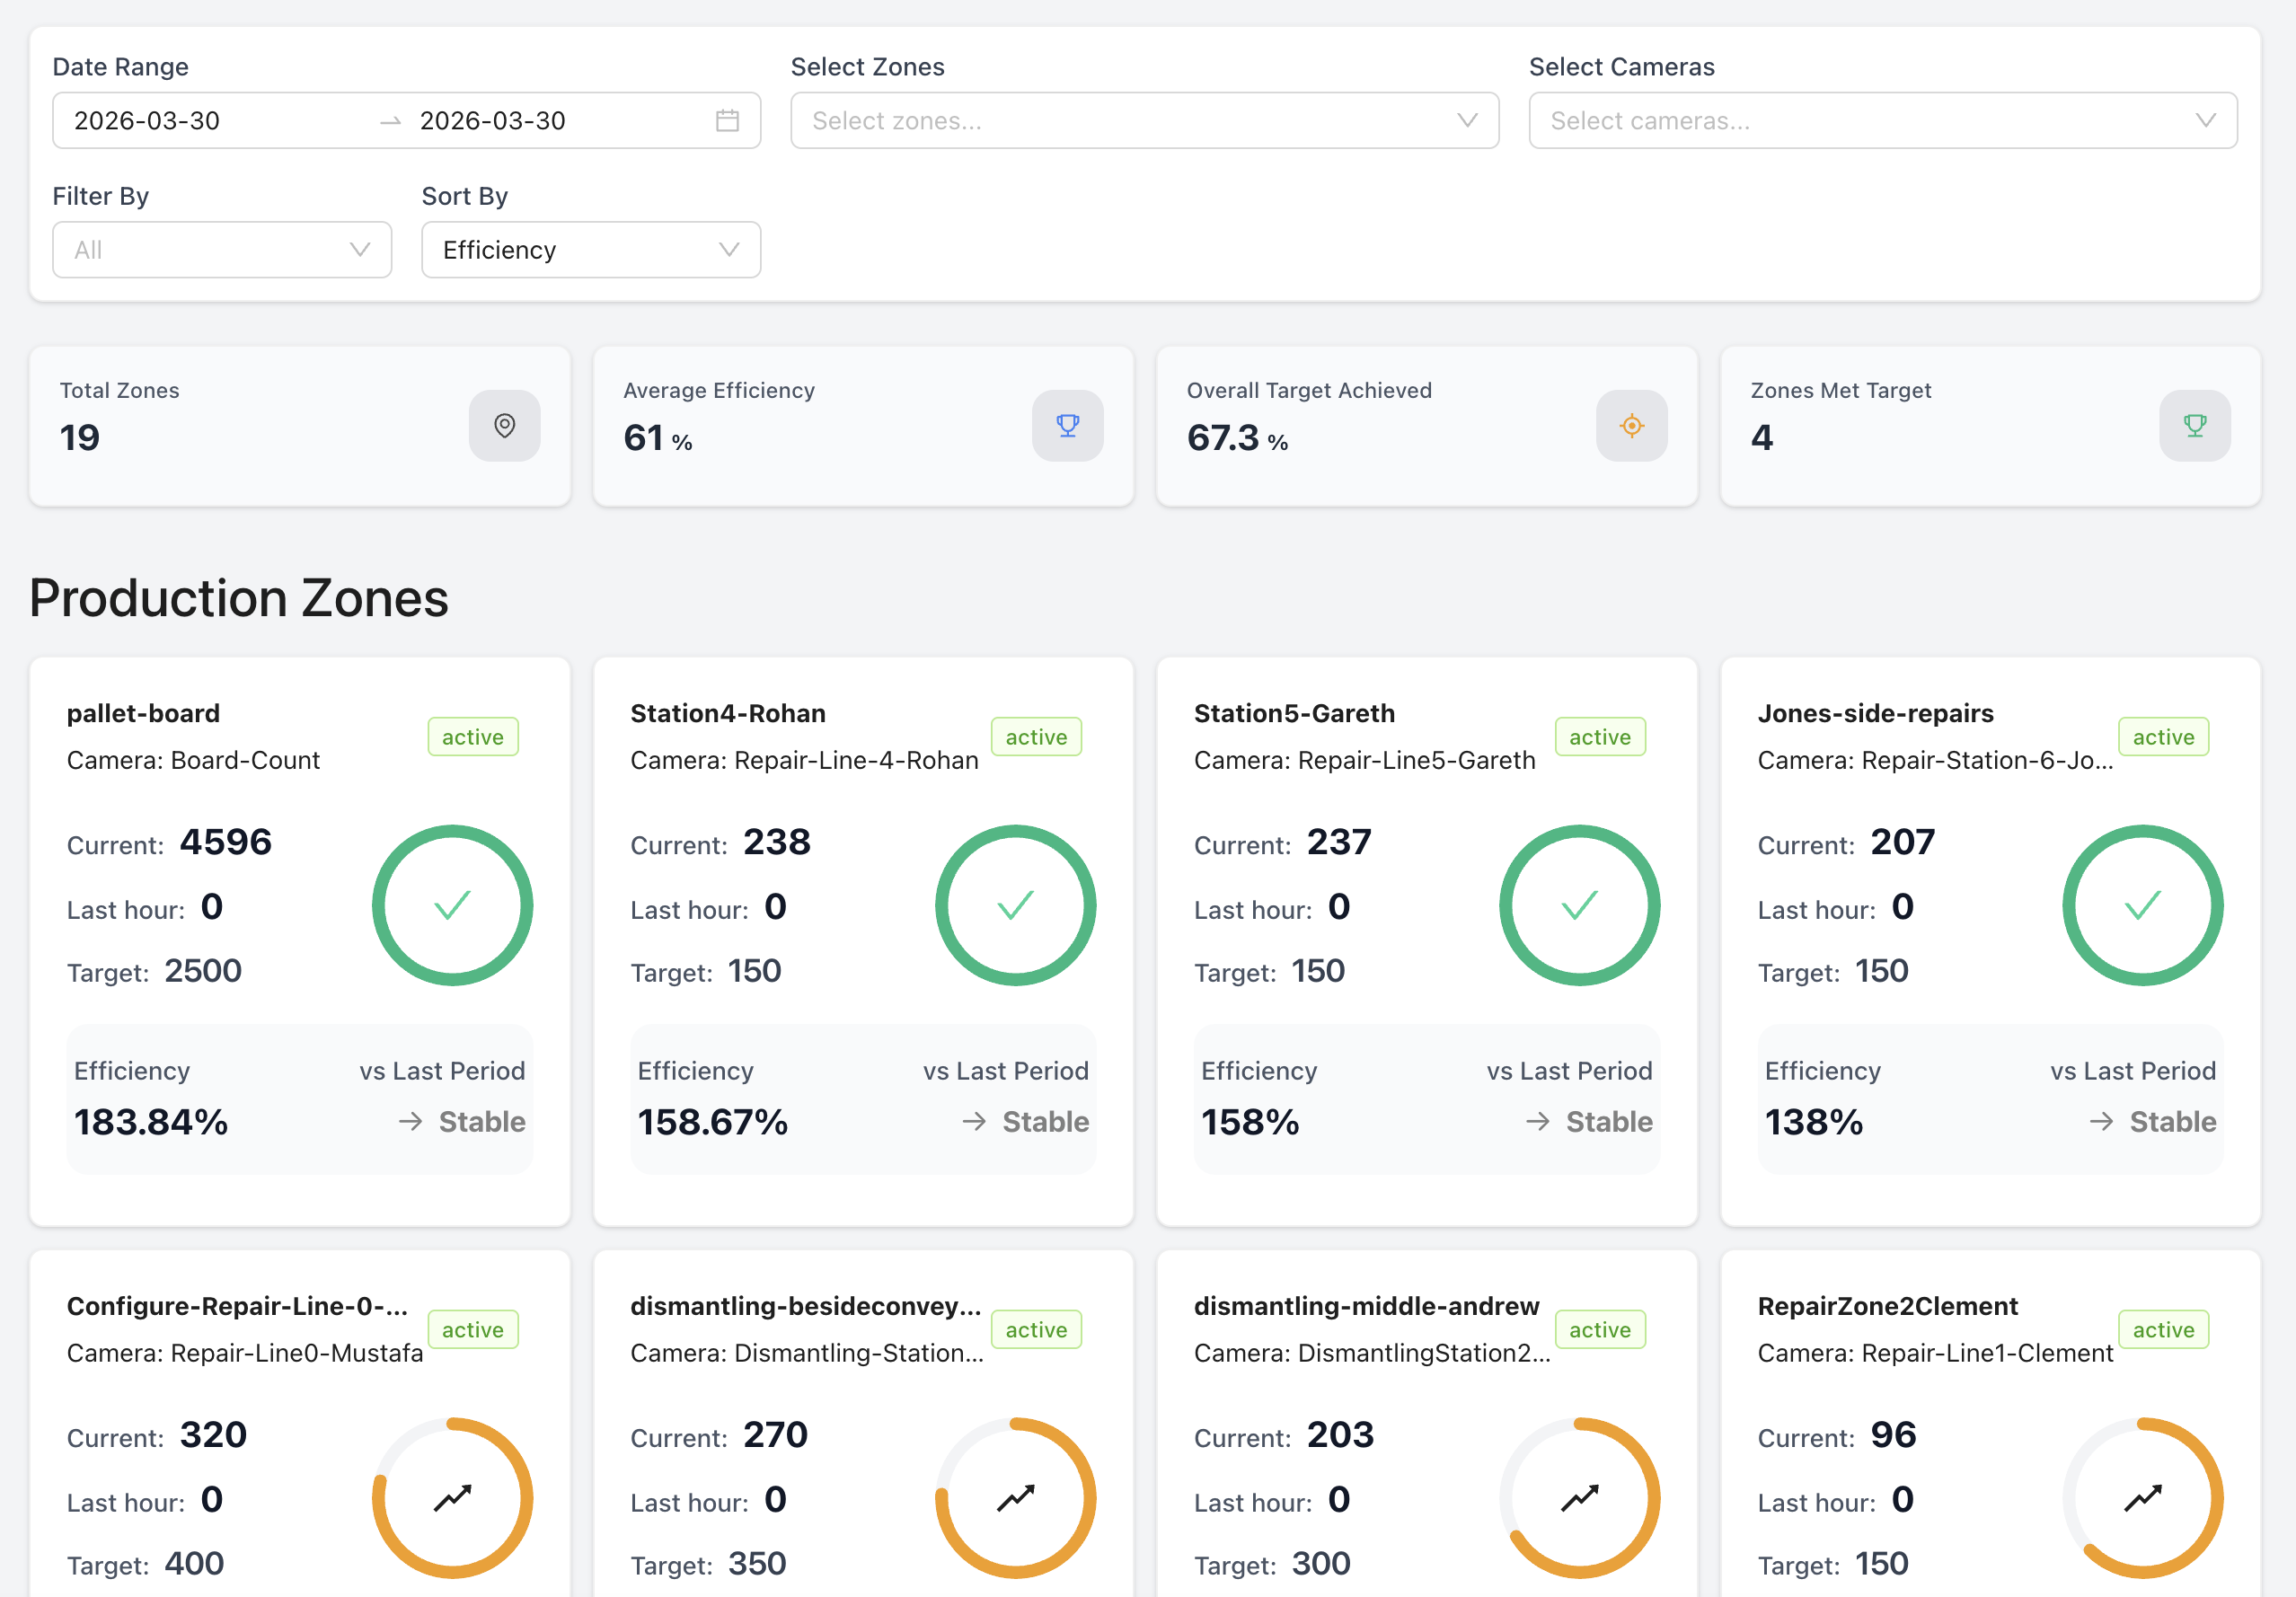
4.3 Per-Camera & Zone Views
Drill into any individual camera or production zone to see its hourly output, current efficiency percentage, trend indicator, and comparison to prior periods.
- Per-Camera Hourly Chart — see which stations are outperforming or lagging
- Zone Metrics Cards — efficiency gauge, target count, units remaining in shift
- Production Leaderboard — all stations ranked by actual vs. target, with % achieved and units remaining
4.4 Video Event Timeline
Every detected pallet event is logged on a timeline with a video clip synced to the detection. Supervisors can click any event to review the footage, verify the count, and flag incorrect detections for AI model feedback.
- Event timeline with timestamped detections and video thumbnails
- One-click video playback — no need to scrub through hours of footage
- Flag & Review — incorrect detections can be flagged to improve model accuracy over time

4.5 Floor TV / Kiosk Display
The dashboard is designed to be displayed on floor TVs with no login required. Mount a TV or monitor in your production area, open a browser, and point it at the dashboard URL.
- Displays live zone cards, current counts, and shift targets
- Automatically switches to the current shift's data
- Kiosk mode: no mouse, no login — just the live data your team needs
Best Practice: Use a low-cost device (Amazon Fire Stick, Raspberry Pi, or smart TV browser) to run the floor display. Set the browser to auto-refresh every 60 seconds if the display does not update automatically.
5. PalletConnect ERP Integration
PalletVision integrates natively with PalletConnect ERP, automatically syncing production counts so your team never has to enter numbers manually. Data flows in real time from the edge server to PalletVision cloud, and then to PalletConnect.
5.1 What Gets Synced
| Data | Description |
|---|---|
| Daily Production Counts | Total counts per station, per scenario, per day |
| Hourly Breakdowns | Count data by hour for shift-level analysis in PalletConnect |
| Target vs. Actual | Efficiency percentages based on daily targets set in PalletVision |
| Shift Data | Counts split by configured shift boundaries |
| Flat-File Export | CSV/flat-file export available for non-PalletConnect ERP systems |
5.2 Configuring the Integration
Step 1 — Obtain PalletConnect API Credentials
Log in to your PalletConnect ERP instance. Navigate to Settings > API / Integrations. Generate or copy an API key for PalletVision. This is provided during onboarding.
Step 2 — Enter Credentials in PalletVision
In PalletVision, go to Settings > Integrations > PalletConnect. Enter your PalletConnect API endpoint URL and API key. Click Test Connection to verify.
Step 3 — Map Stations to PalletConnect Work Centers
For each PalletVision zone/station, select the corresponding PalletConnect work center or cost center. This mapping ensures counts flow to the correct ERP records.
Best Practice: Run a full production day with auto-sync enabled and compare PalletVision counts with PalletConnect records to verify accuracy before going live. If your organization does not use PalletConnect, use the flat-file export feature to pull CSV data on a schedule.
6. Edge Server — Configuration & Best Practices
PalletVision processes all video on-site using an edge server supplied by PalletVision. This means raw camera footage never leaves your facility — only small video clips, count data and events are sent to the cloud.
6.1 Hardware Overview
| Spec | Details |
|---|---|
| Form Factor | Mac Studio or Mac Mini M4 Pro |
| Connectivity | 1 GbE LAN, Wi-Fi (not recommended for production use) |
| Power | Standard 110/240V outlet; uninterruptible power supply (UPS) strongly recommended |
| OS | Pre-installed by PalletVision; no OS installation required |
| Camera Capacity | Mac Mini M4 Pro: Up to 6 cameras. Mac Studio: Up to 12 cameras |
6.2 Network Setup
- Connect the edge server to your facility network via wired Ethernet. Do not use Wi-Fi for the server itself.
- All cameras must be reachable from the edge server's subnet. Cameras and server should ideally be on the same VLAN or network segment.
- Ensure port 554 (RTSP) is open between the edge server and all cameras.
- Outbound HTTPS (port 443) must be open from the edge server to the internet for cloud sync.
- Allocate a static IP or DHCP reservation for the edge server to prevent IP changes disrupting camera streams.
Important: If cameras are on a separate VLAN from the edge server (common in facilities with managed switches), ensure inter-VLAN routing is enabled for the camera subnet to reach the server. VPN-only environments: contact PalletVision support to configure outbound sync over VPN.
6.3 Edge Server Configuration Steps
Step 1 — Physical Installation
Mount or place the server in a cool, ventilated location near your network switch. Connect: power, Ethernet to your network switch, and optionally HDMI + keyboard for initial setup. Power on the device.
Step 2 — Connect to Internet
Power on the device and log in with the credentials provided in your onboarding kit. Ensure internet connectivity is ON. (LAN Connectivity Recommended, Wi-Fi will also work, but may result in frame-drops, therefore missing counts).
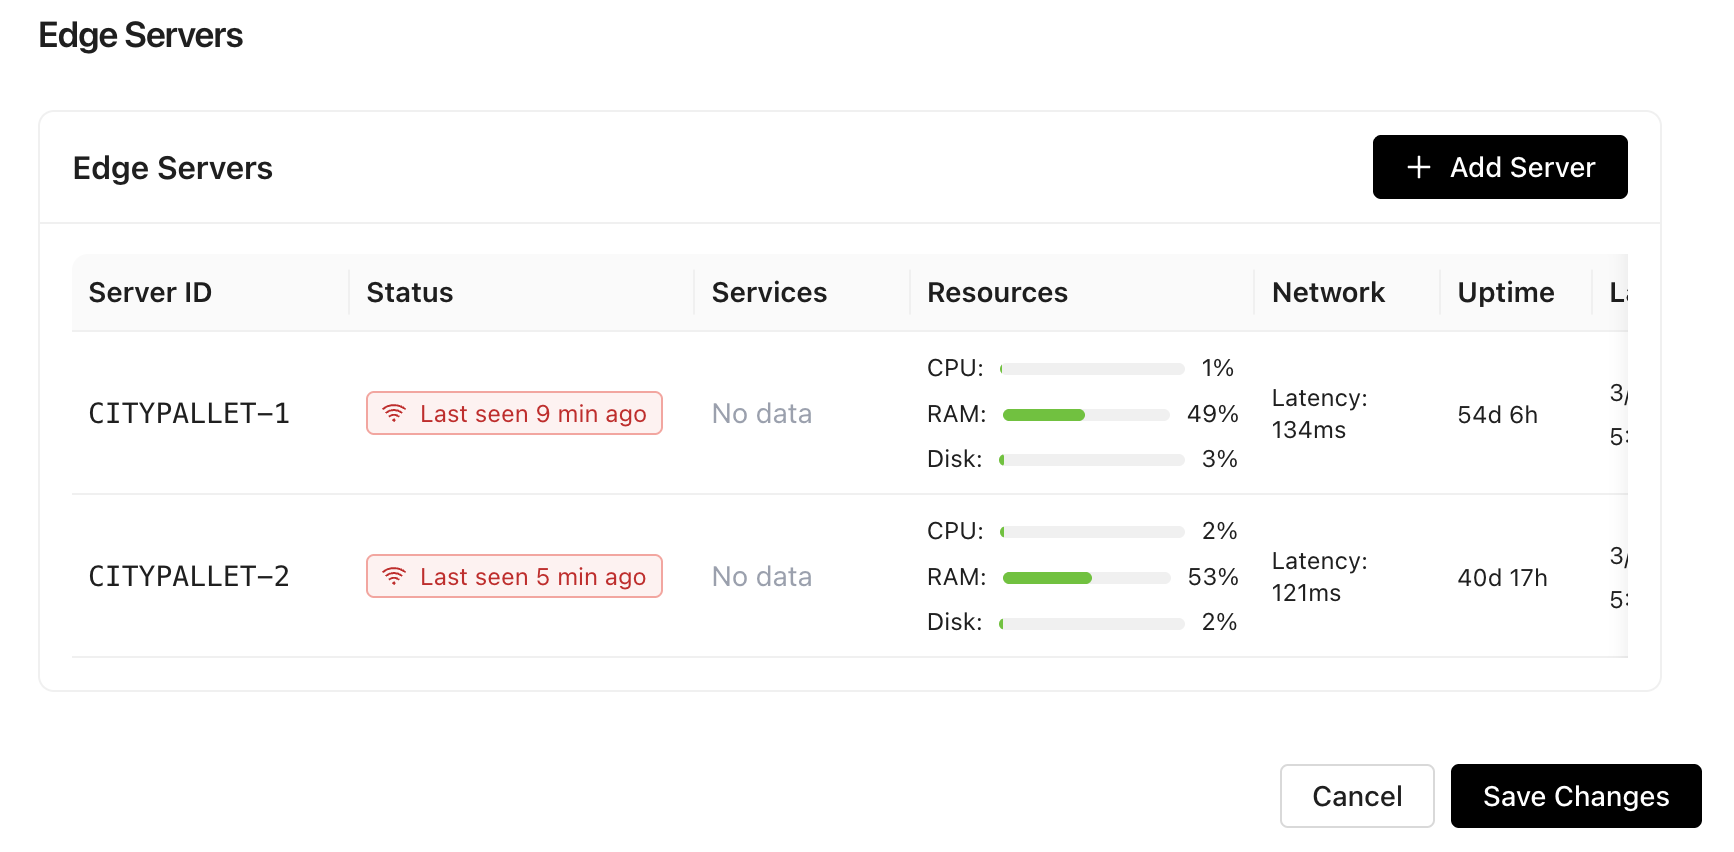
Step 3 — Register with PalletVision Cloud
In the Edge Dashboard, navigate to Settings > Site Settings > Edge Server > Add Edge Server. Click Register with details provided with your onboarding kit. The server will appear in your web app under Dashboard > Edge Servers.
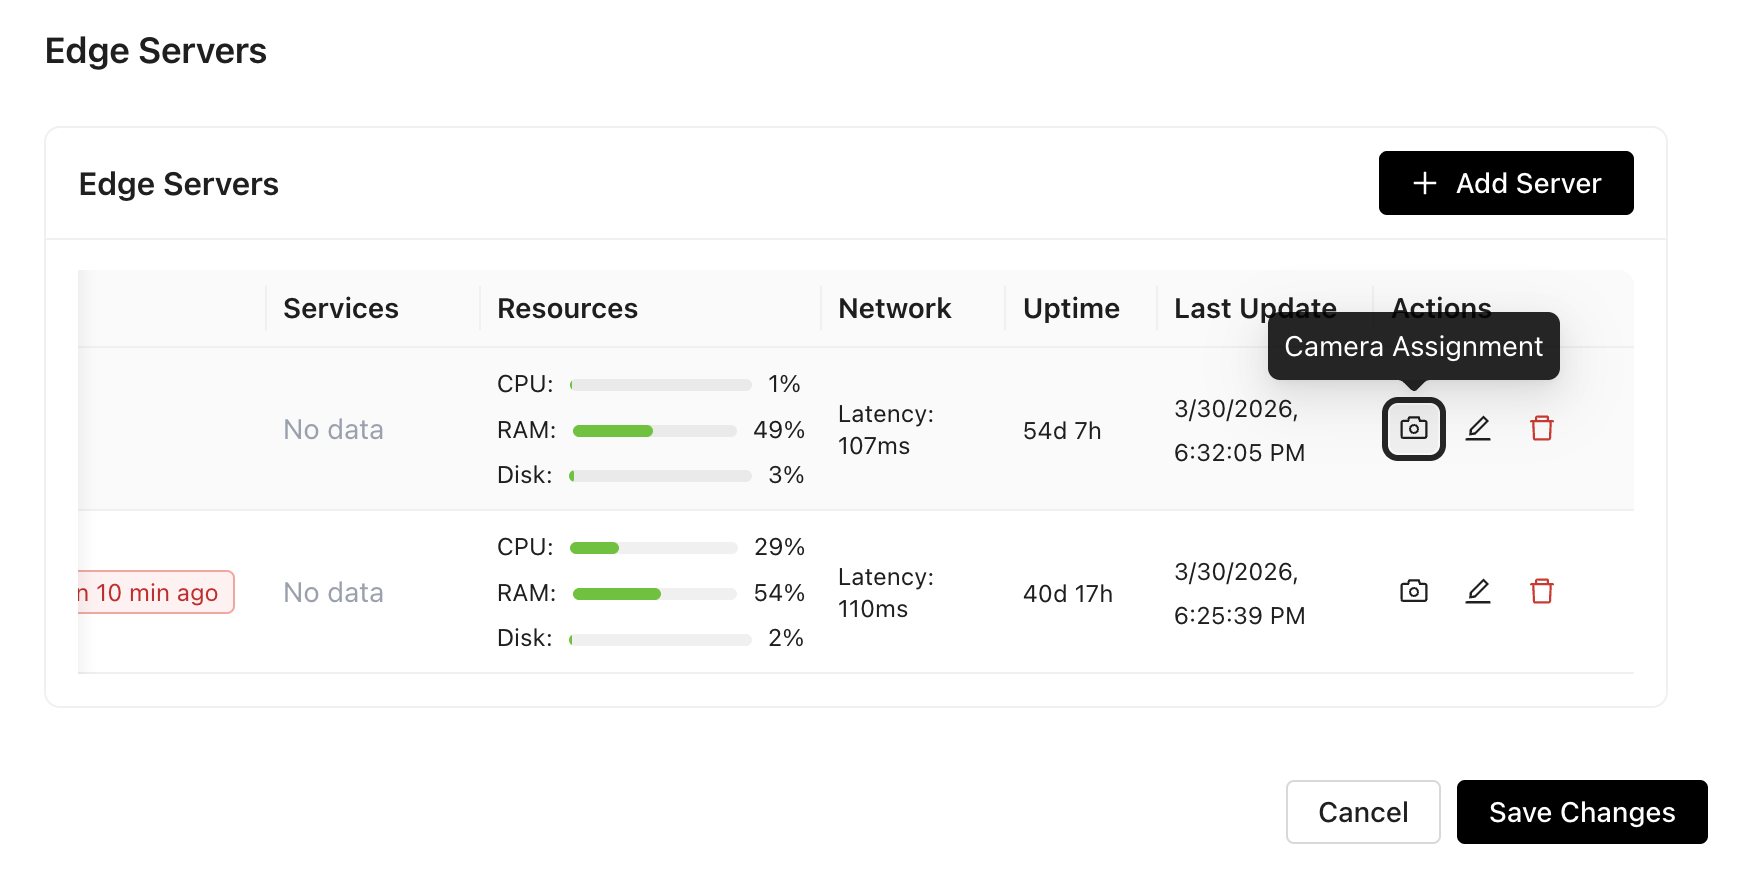
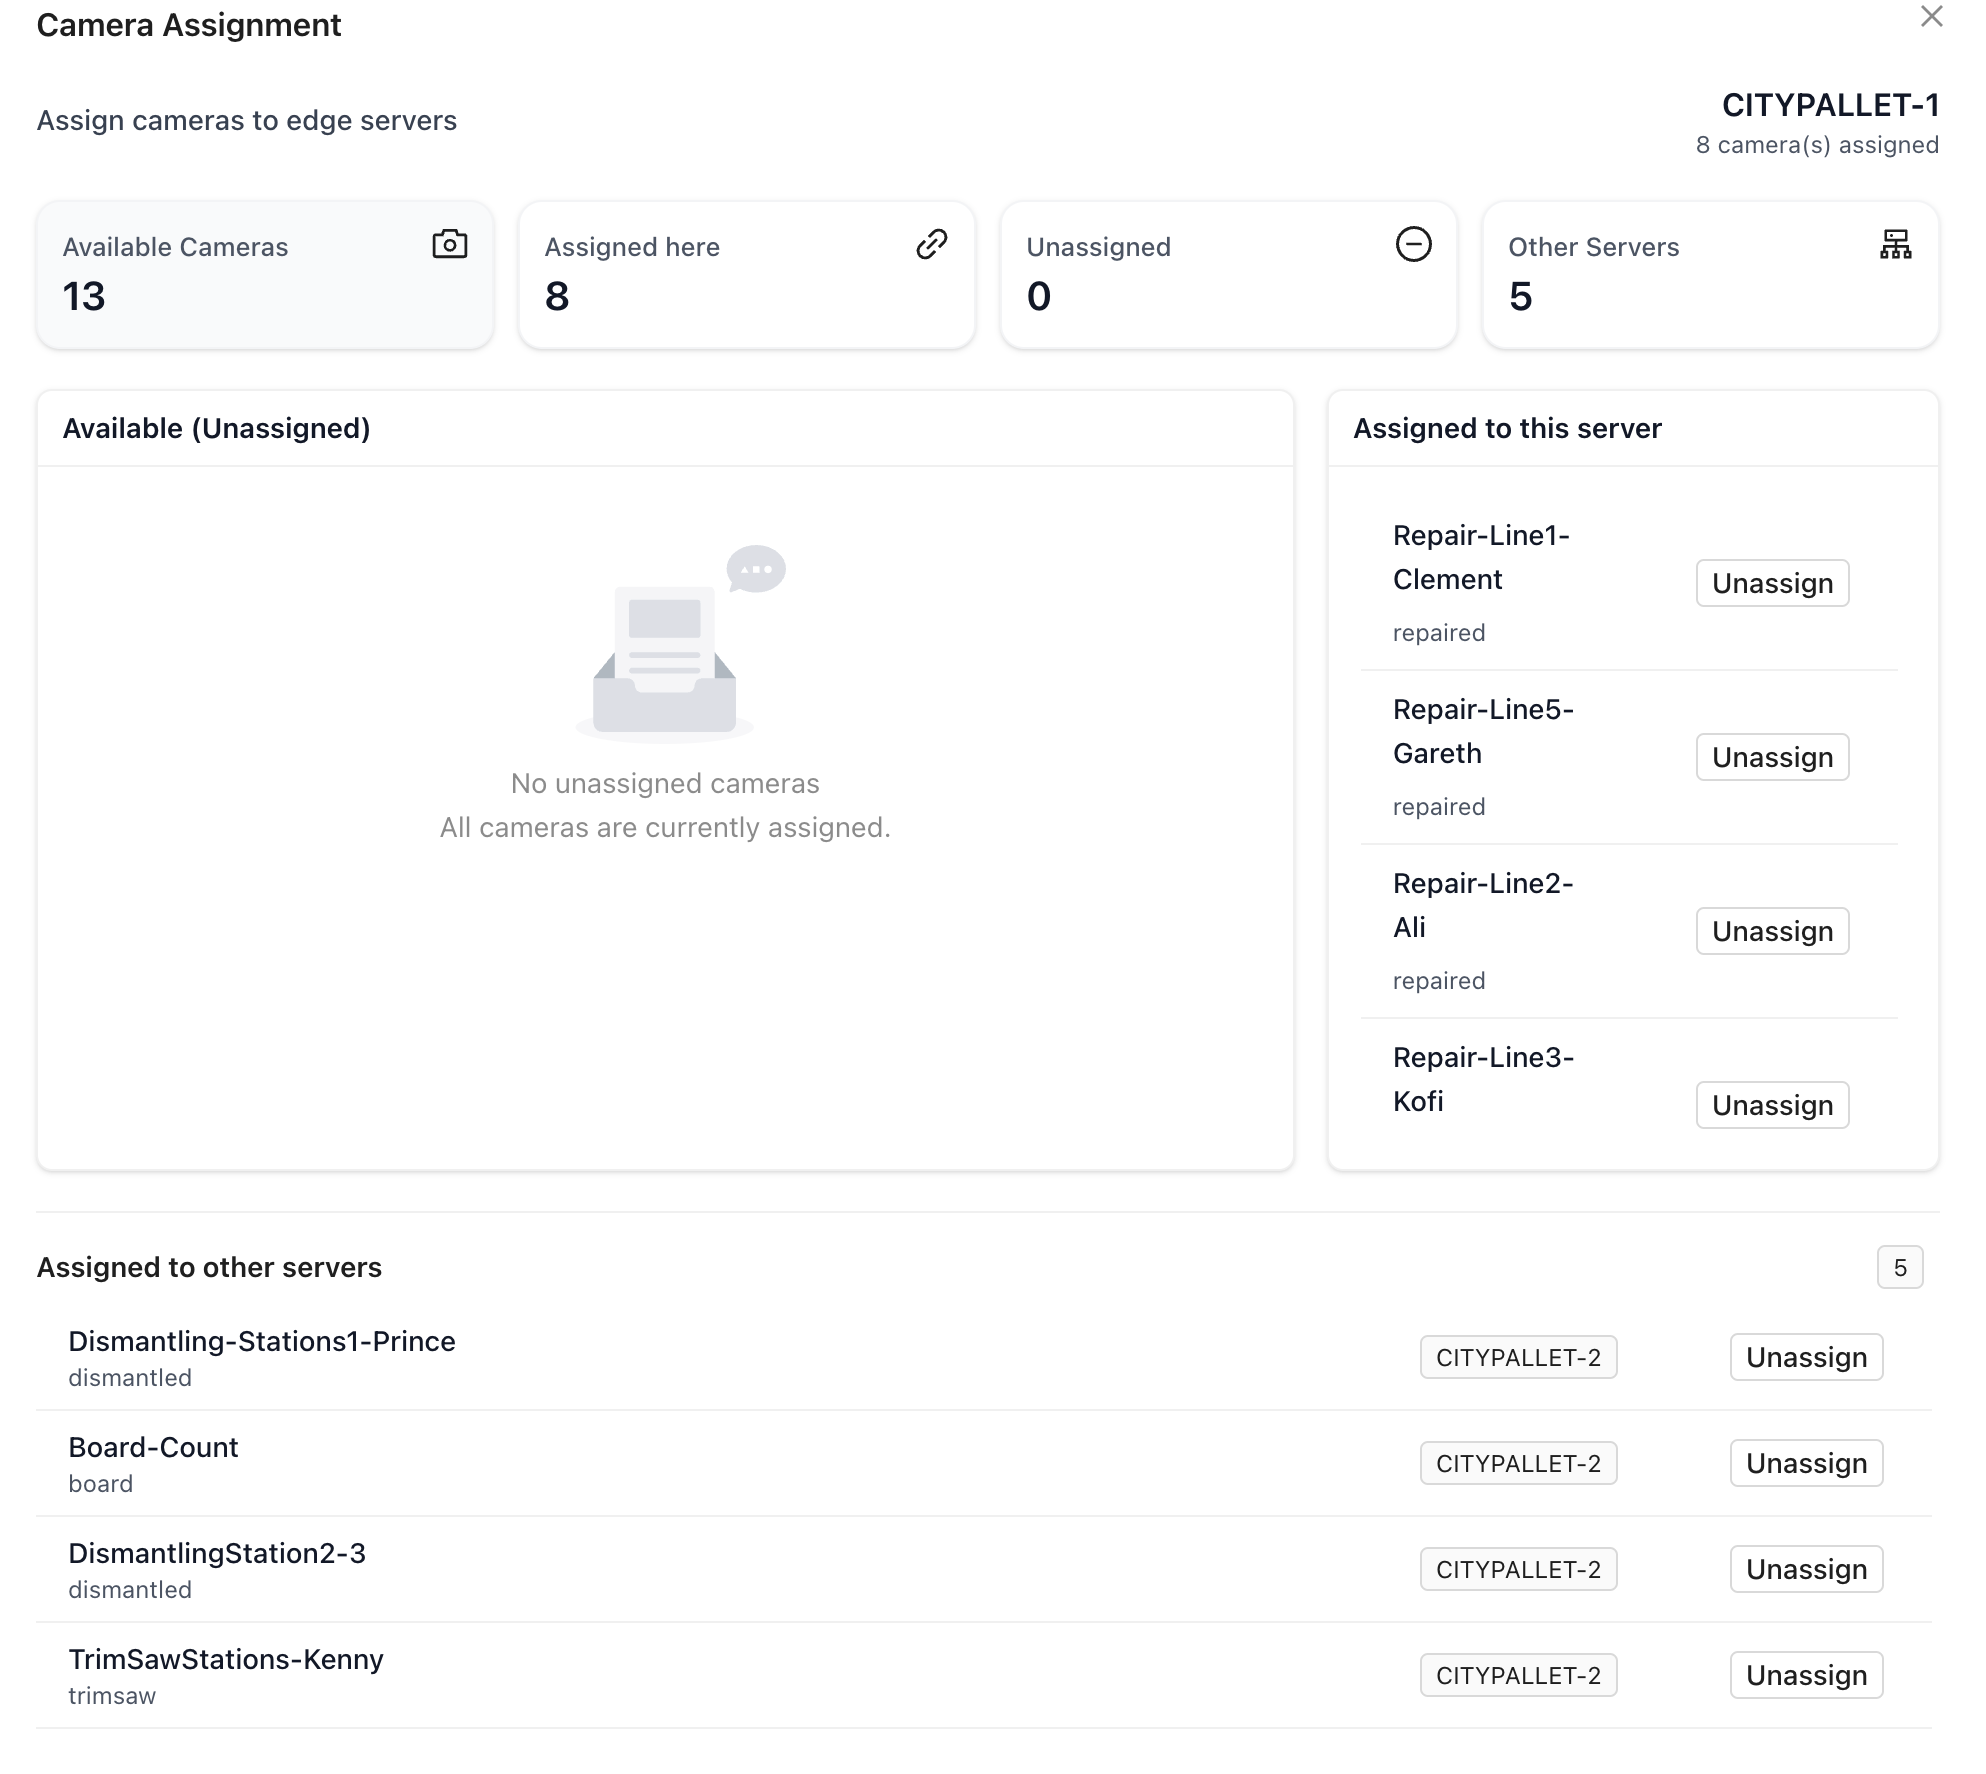
Step 4 — Add Cameras to the Edge Server (Optional, if you have more than 1 server)
Go to Settings > Site Settings > Edge Servers. Next to your Edge Server, you will see a Camera Assignment Icon, click on that. Assign cameras to Edge Servers as you prefer.
6.4 Best Practices for Edge Server
- Install a UPS (uninterruptible power supply) to protect the server from power outages. Unexpected shutdowns can corrupt the database.
- Keep the server in a cool environment (below 95 F / 35 C). Avoid enclosing it in sealed cabinets without ventilation.
- Do not install third-party software on the edge server — it runs a hardened OS optimized for AI inference.
- Schedule regular restarts (e.g., nightly at 2:00 AM) to clear memory and apply updates. Configure this in the Edge Dashboard under Settings > Maintenance.
- Keep the server's network connection stable. Avoid connecting cameras through Wi-Fi bridges or powerline adapters.
7. Troubleshooting
Use the table below as a first-line reference for common issues. If problems persist, contact PalletVision support at support@palletvision.ai with your site name and a description of the issue.
| Symptom | Likely Cause | Resolution |
|---|---|---|
| Counts not registering | Active zone not configured or too small | Open zone editor, redraw the zone to cover the full pallet path. Confirm the zone is saved and active. |
| Counts lower than expected | Counting line mispositioned | Reposition counting line perpendicular to pallet travel path and ensure it spans the full width of the aisle. |
| Camera feed not loading | Incorrect RTSP URL or firewall blocking port 554 | Re-test URL in VLC. Verify port 554 is open between edge server and camera. |
| Low FPS (under 10) | Insufficient network bandwidth | Check switch capacity. Reduce camera resolution or bitrate if bandwidth is constrained. Target 2 Mbps per camera. |
| AI detection overlay missing | Scenario not activated | Re-check zone editor: confirm scenario is assigned and status is "Active". |
| Counts appear at wrong times | Incorrect shift schedule | Verify shift start/end times in Settings > Facility > Shifts. |
| ERP sync not working | Invalid API key or endpoint | Re-enter PalletConnect credentials in Settings > Integrations and re-test connection. |
| Dashboard not updating | Browser cache issue or network connectivity to cloud | Hard-refresh the browser (Ctrl+Shift+R). Verify edge server has outbound internet access on port 443. |
| Board Count accuracy low | Camera angle not top-down or boards overlapping heavily | Remount camera for top-down view. Spread boards more evenly before counting. |
| False counts in idle periods | Zone extends into walkway or storage area | Narrow the active zone polygon to exclude high-traffic areas outside the work surface. |
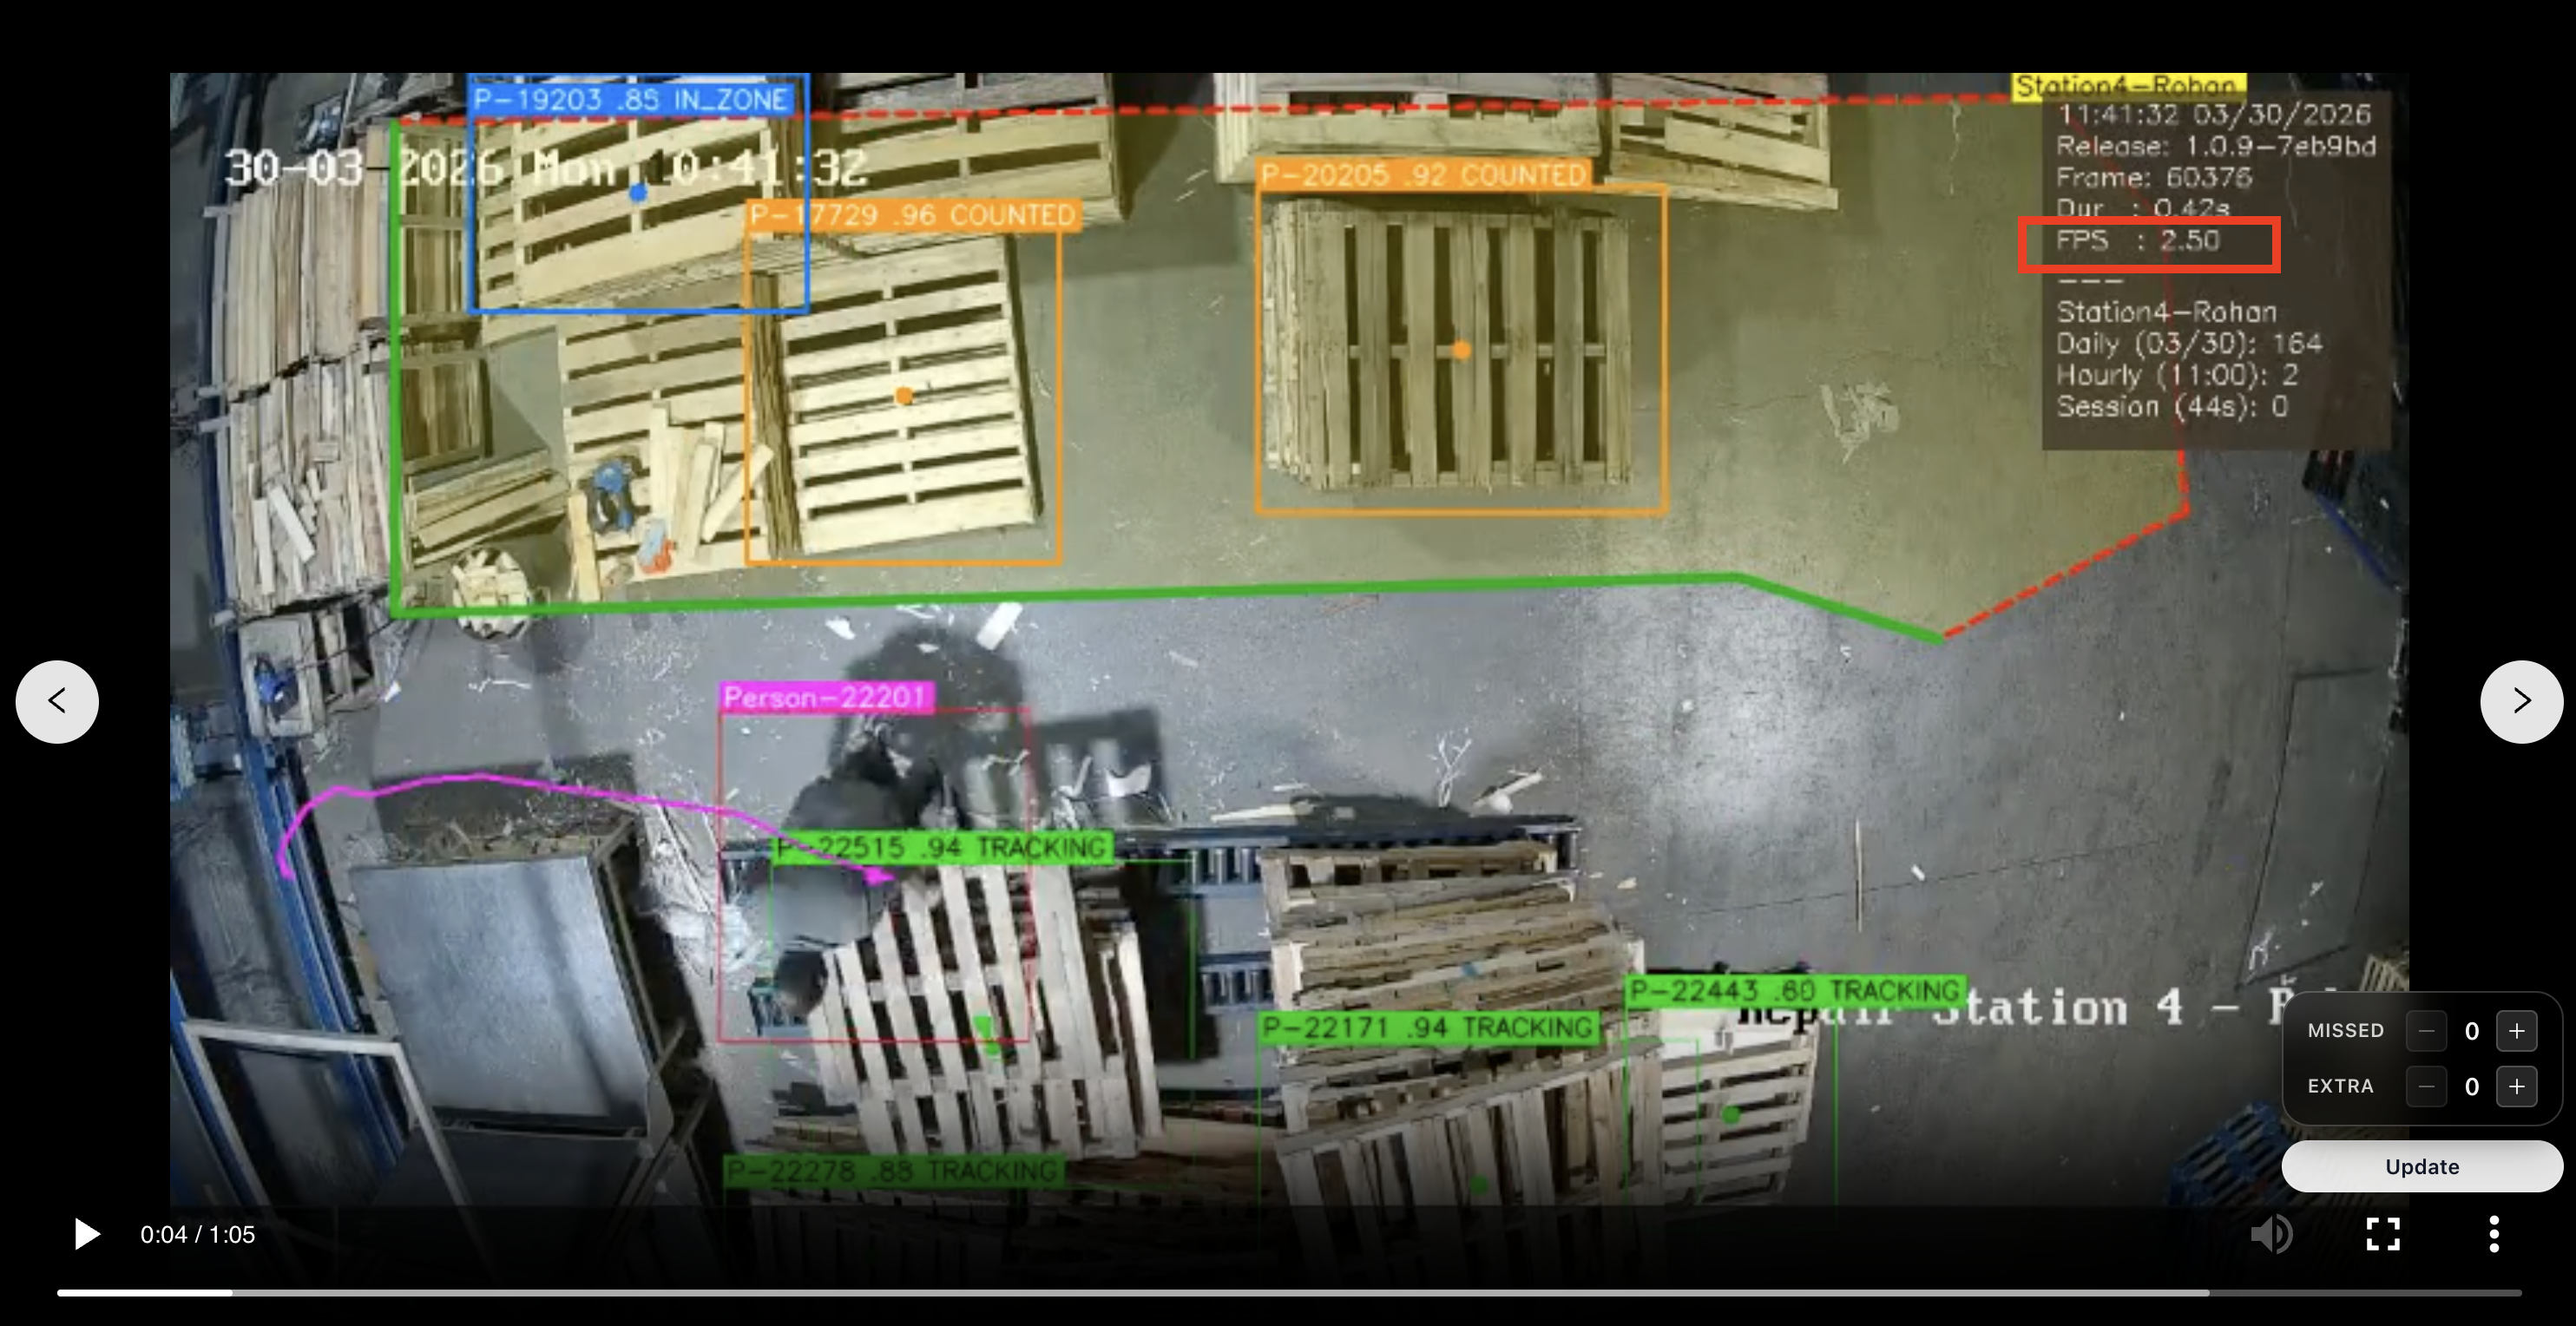
7.1 FPS Diagnostics
Frame rate is one of the most important factors in counting accuracy. To check FPS from the edge server:
- Log in to the PalletVision Dashboard.
- Go to Cameras > select a camera > Timeline Videos.
- Click on any timeline video, and look at the top-right corner for metrics.
- Note the FPS value. Target: 3-5 FPS. This represents the inference FPS.
- This is the Inference FPS, not raw-camera FPS.
- Raw Camera FPS of 15 = Inference FPS of 5.
- If below 3 FPS: check network bandwidth, verify the camera is not overloaded with multiple simultaneous stream requests, and try lowering the camera's output resolution from 4K to 1080p.
Note: PalletVision's AI model processes at the frame rate delivered by the camera stream. 5 FPS (inference) provides the right balance between number of cameras supported & accuracy. Higher FPS does not improve accuracy and increases server load unnecessarily.
7.2 Camera Angle & Zone Checklist
Use this checklist to verify your camera and zone setup:
- Camera angle is top-down or isometric (not extreme side angle)
- Full pallet and work area are visible in frame with buffer space on all edges
- Camera is mounted at 10-15 ft height (for top-down)
- Lighting is adequate — no extreme shadows or glare obscuring the work area
- RTSP stream confirmed stable in VLC at 10+ FPS (Inference FPS is 3-5 FPS)
- Active zone polygon covers the entire pallet path
- Counting line (if used) is perpendicular to pallet movement
- Scenario is assigned and status is "Active" in zone editor
- Zone name is correctly assigned to the right station in the dashboard
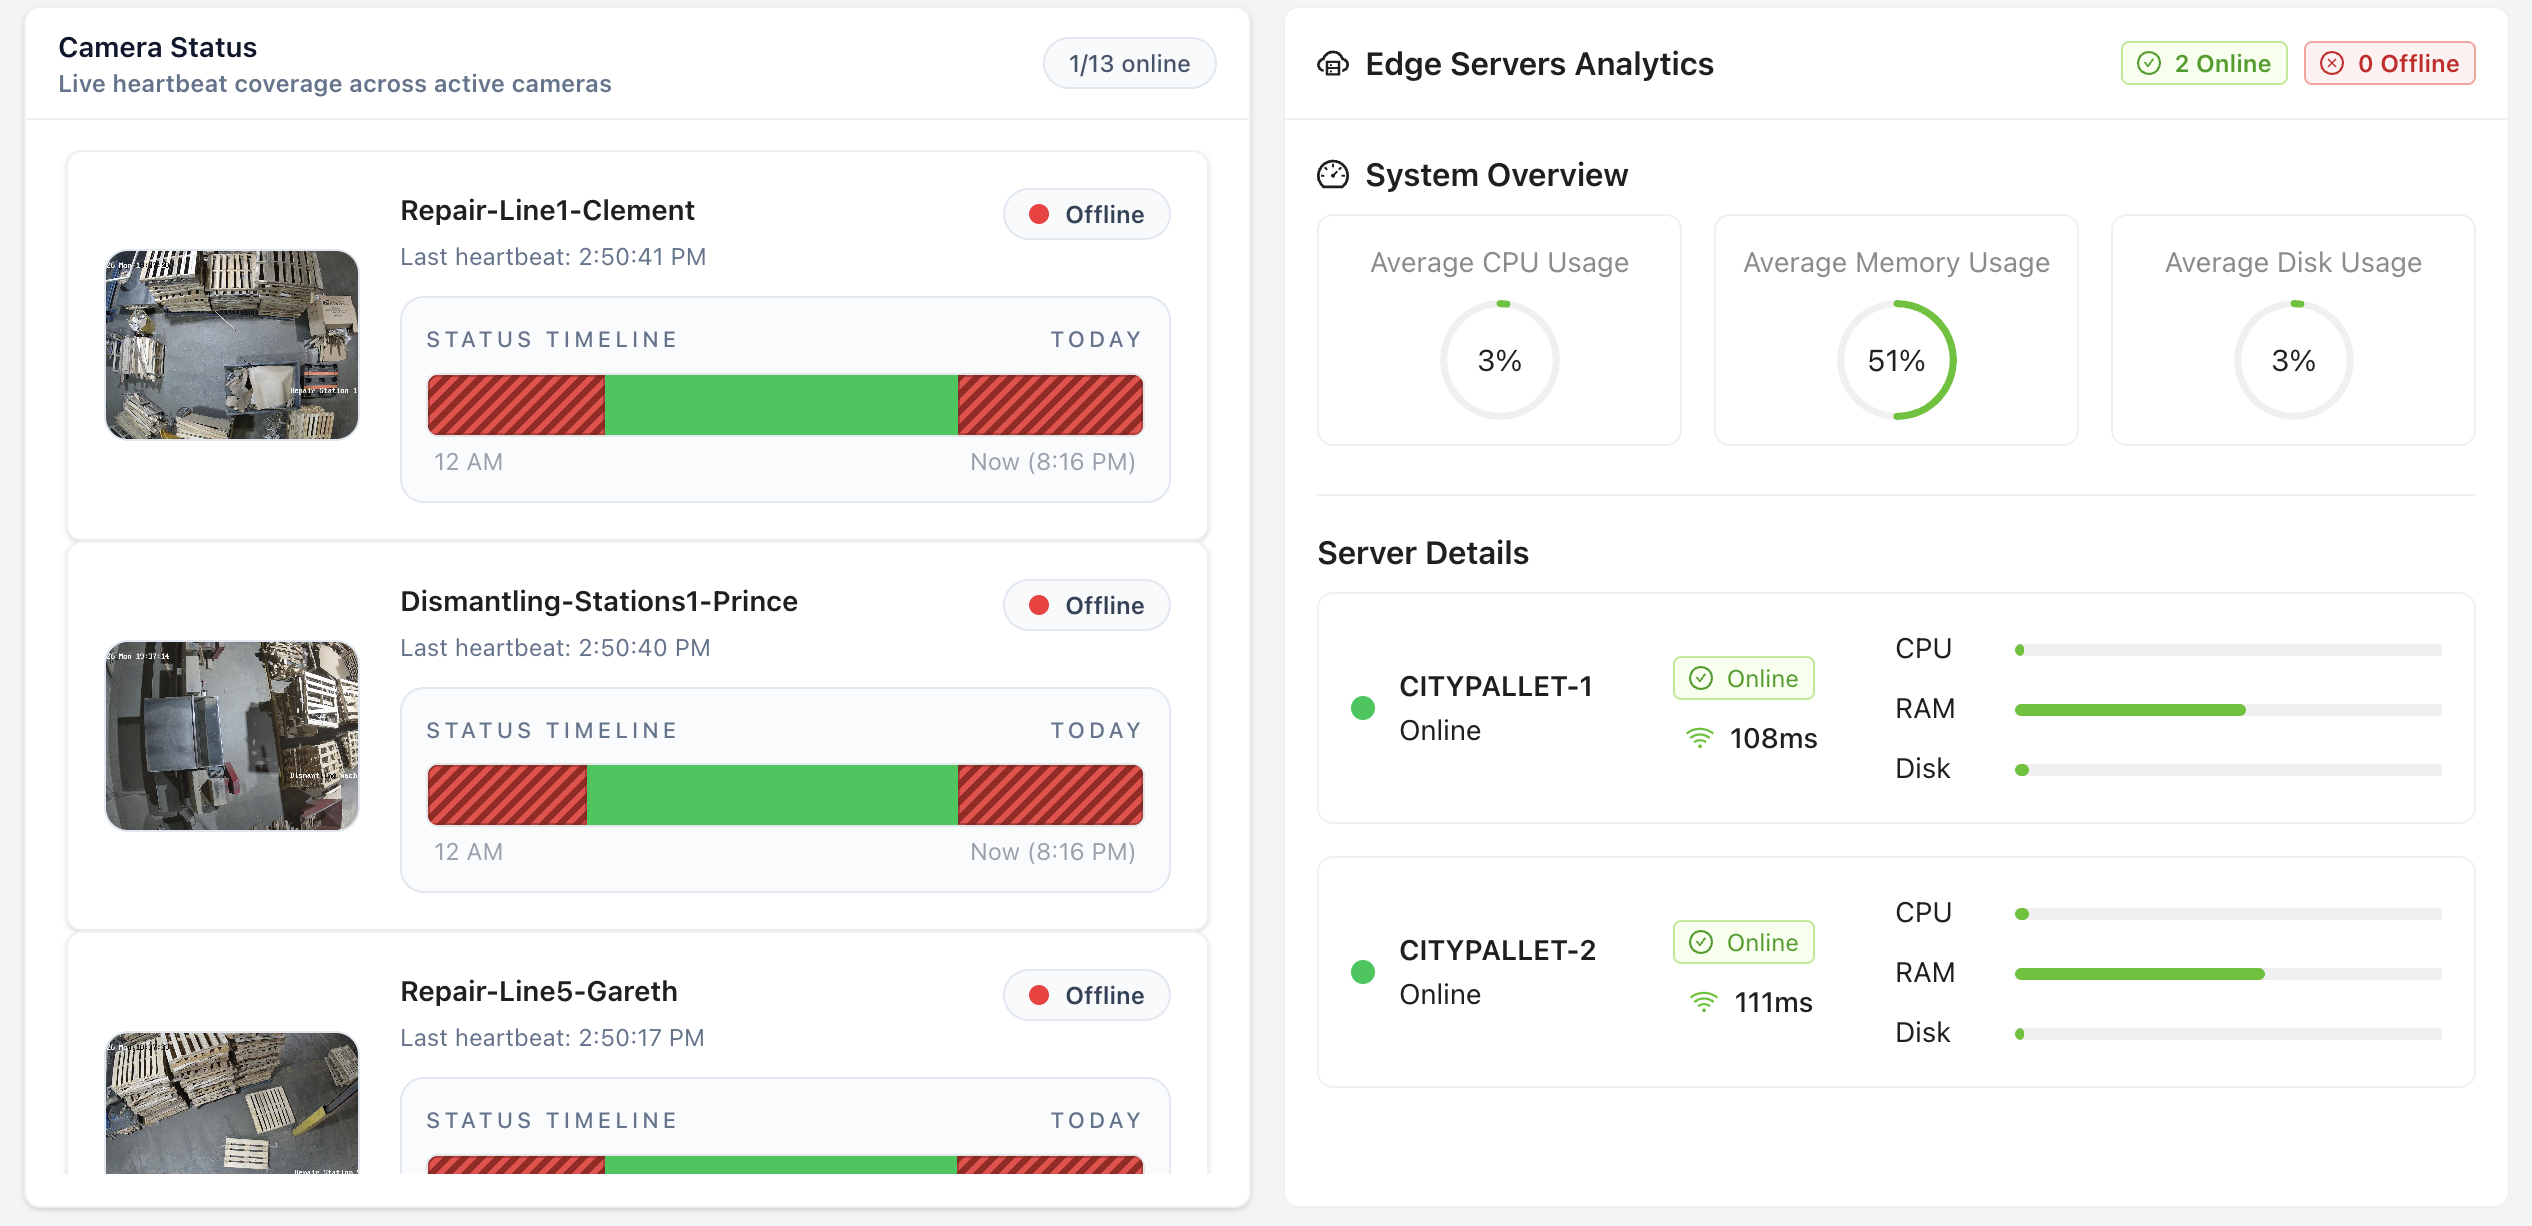
8. Camera & Edge Server Status
The PalletVision dashboard provides real-time monitoring of all your cameras and edge servers. Check the status page to confirm all devices are online and streaming correctly.
9. Quick Reference
9.1 Onboarding Checklist
| # | Task |
|---|---|
| 1 | Install edge server and connect to network |
| 2 | Confirm all cameras reachable from edge server (ping test) |
| 3 | Obtain RTSP URLs for all cameras |
| 4 | Test all RTSP streams in VLC (10+ FPS, stable) |
| 5 | Create PalletVision account & facility profile |
| 6 | Onboard all cameras in web app (RTSP + preview verified) |
| 7 | Configure active zones for every camera |
| 8 | Assign AI scenarios to each zone |
| 9 | Run test counts — verify AI detects pallets correctly |
| 10 | Configure shift schedule and daily targets |
| 11 | Set up PalletConnect ERP integration (if applicable) |
| 12 | Set up floor TV kiosk display |
| 13 | Train supervisors on dashboard navigation |
| 14 | Complete one full production day — review accuracy |
9.2 Key Contacts & Resources
| Support Email | support@palletvision.ai |
| Website | https://palletvision.ai |
| Documentation | https://palletvision.ai/docs |
| Schedule a Demo | https://palletvision.ai/schedule-demo |
| Changelog | https://palletvision.ai/changelog — check for latest AI model updates |
| Security Policy | https://palletvision.ai/security |
Questions? Contact us or email support@palletvision.ai.